YaleSites Pre-Built Features
YaleSites comes packaged with pre-built Features to help make it easier to add the most common types of content and special effects to your site. Each Feature includes a Content Type to capture the information and a variety of Views to display your information. Features can be customized to meet your department needs with knowledge of Content Types and Views.
Additional functionality can also be added using other Modules available with your YaleSites.
Add Pre-Built Features
Taking advantage of YaleSites features is easy. News, Rotating Header Image, and Calendar are available and ready to use when you get your YaleSite; all you need to do is add content. Other features such as Gallery, Publications and Courses need to be enabled in the Features section of the Module listing page. Once enabled, the Content Types and Views are available for use.
Enable Modules
- Click on Modules > Scroll down to the Features section of the listing.
- Locate the Feature you want to enable, click on the checkbox and then the Save configuration button.
Adding Content
- Click on Add content and select the Content Type for the feature you selected (i.e. for the News you would select Content -> Add content -> News.
- Add content in the appropriate fields.
- Pages, blocks and views are dynamically created based on the features.
Calendar & Events
The Calendar and Events listing feature provides a way to capture your events and list them in various displays, including a calendar grid. In addition to listing events added directly to your YaleSite, you can also pull events from the Calendar and the Yale University Calendar (Yale Bedework Calendar Feature) and display them within your YaleSite.
Adding Events to your site
- Click on Content -> Add content -> Event in the toolbar.
- Complete the following fields where applicable:
- Add a title for the page
- Upload an image (optional)
- Enter the location of the event
- Choose a date from the pop-up calendar if it is different from today’s date.
- If your event has an ending time/date, click on the Show End Date check box to add an end date and time.
- Enter a description of the event in the Description field.
- Click on the Save button to save the page and publish it live.
Feature Specifications
Content Type
The Event Content Type has the following fields:
- Title – title of the event
- Image – upload field; the image displays in the upper left corner of the landing page and as the thumbnail in the event listing page; this field is optional.
- Event location: location where the event takes place.
- Event time – date of the event; can add an end time by checking the Show End Date or indicate All Day.
- Event description – main body content including links, images, etc. Images that are uploaded should be placed below the first paragraph, as the image field displays in the upper left corner of the landing page.
- URL alias - event/page-title
Views
- Events listing page – listing of 10 most recent events; full pager displays below when 11 or more events are available. The Page URL is set to yoursite.yale.edu/events.
- Calendar Grid Block – displays the current month in a calendar grid with previous and next arrows that move through the months to find future events; each day that has an event is a clickable link that displays events for that day.
- Upcoming Events Block – links to the 10 most recent events; a ‘More’ events link points to a full page listing of events with a pager.
- Past Events Block – links to the 12 most recent months, and has a listing of event archives. This block only displays as archives are available.
- Day, Week, Month and Year – displays the events page by Day, Week, Month and Year.
Gallery
The Gallery Feature provides a way for you to create an inline photo gallery or slideshow that is embedded as part of your page. This feature also provides a list of photo galleries for your site in the event you have multiple galleries you want to display. You can access the page at sitename.yale.edu/galleries.
Enable the Yale Gallery Feature
Once the feature is enabled you can begin to add photo galleries to your site.
- Click on Modules, and scroll down to the Features section to locate the Yale Gallery Feature.
Adding a Gallery to your site
- Click on Content -> Add content -> Gallery in the toolbar.
- Complete the following fields where applicable:
- Enter the Title of your page/photo gallery.
- Change the date in the event that it is different from today’s date.
- Click on Advanced Upload and drag the images you want to be part of the gallery to the pane.
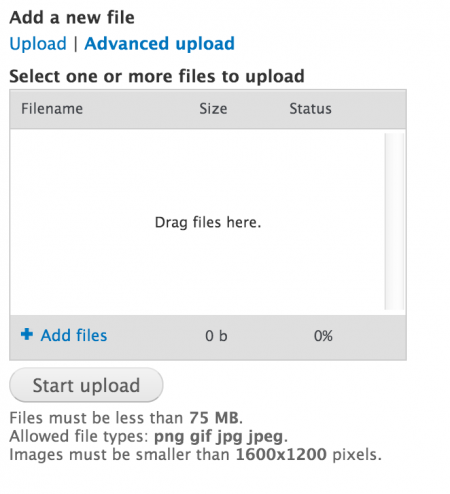
- Click on Start Upload.
- Enter alternate text to be used by screen readers and a title for the caption text that displays below the image.
- Enter the details about the gallery in the Description field.
- Add a link to a related news story from an external website.
- Click on the Save button to save the page and publish it live.
Feature Specifications
Content Type
The Gallery Content Type has the following fields:
- Title – title of the gallery
- Image – upload field; allows you to upload as many images as you like.
- Date – date of the gallery; can be different from today’s date.
- Description – main body content including links, images, etc. Images that are uploaded should be placed below the first paragraph, as the image field displays in the upper left corner of the landing page.
- URL alias - gallery/page-title
Views
The gallery itself displays on the page you create.
- Gallery Listing Page – displays the 10 most recent galleries and a pager when there are 11 or more items. The first image as the thumbnail. Page URL is set to sitename.yale.edu/galleries.
News Feature
The News Feature provides a way for departments and organizations to add news items and list them in various ways. The News Feature provides a Content Type for capturing the news articles and various Views to display the content. All you need to do is add news items to your site, and they will automatically display in the news listing page with the most recent on the top of the list.
Adding News to your site
- Click on Content -> Add content -> News in the toolbar.
- Complete the following fields where applicable:
- Upload an image.
- Choose a date from the pop-up calendar if it is different from today’s date
- Enter the main body content (description)
- Add a link to a related news story from an external website.
- Click on the Save button to save the page and publish it live.
Feature Specifications
Content Type
The News Content Type has the following fields:
- Title – title of the news item
- Image – upload field; the image displays in the upper left corner of the landing page and as the thumbnail in the News listing page
- Content – main body content including links, images, etc. Images that are uploaded should be placed below the first paragraph, as the image field displays in the upper left corner of the landing page.
- Date – date the article is created; can be different from today’s date.
- Related Link – link to a related news article on an external website.
- URL Alias – news/page-title
Views
- News Page – listing of 10 most recent News items; full pager displays below when 11 or more news items are available. Page URL is set to yoursite.yale.edu/news
- News Block – displays the three most recent News items; ‘More’ link in the lower right corner opens the News page; displays on the home page in the content area.
- News Listing Block – displays a list of links to the five most recent news items.
- Side Listing Teasers Block – displays a list of the five most recent news items with a thumbnail image, Title as link to article page and intro text for the article.
- Side News Scroller Block – Same as the Side Listing Teaser Block but has a scroll bar so you can include more stories in a smaller amount of space.
- News Archive Block – links to the 12 most recent month listing of archives; this block only displays as archives are available.
- Views Accordion News Page – displays the 7 most recent news listings, where the title expands to display the entire article or teaser.
People Listing Feature
The People Listing feature provides you with the Content Type and Views to collect, tag and display the various types of people for your department or organization. You can now add people to your site using their NetID and their full name, phone, email, address and title automatically populates into a profile from the HR database.Additional fields can be added to capture more information about the people for your organization/department.
All of the information for people is added in a User Profile, which means that you can allow people in your department or organization to add their own information without compromising the rest of the site.
Enable the Yale People Listing Feature
In order to utilize the Content Types and Views that are part of the Yale People Listing Feature, you need to enable the following modules/features:
- First go to Modules > Features
- Scroll down to the Features section and locate/enable the following:
- Yale People Listing
- Yale Courses
- Yale Publications
Add People
As the administrator, you can add People to your site as long as you know their NetID:
- People > Add CAS user >Enter their NetID and save. See Managing People for more information.
- Next go to the People listing and locate the person you just added. Click on the edit link next to their name.
- Notice that the first name, last name, title, email, phone, address, department and organization display in the fields. This information is automatically pulled from the HR Database when you first add the person. This information is NOT updated automatically.
- You can change the information in the fields, or remove information if you don’t want it to display.
- In order for people to show up on the list, they must select a People Type* from the drop-down list.
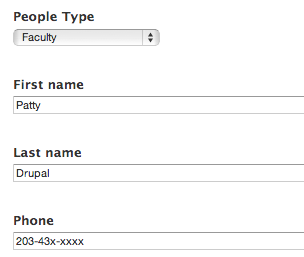
- Upload an image if desired.
- Save the Profile and go to http://yoursitename.yale.edu/people. You will see a listing of people that have been tagged with the People Type, grouped by that type in the list.

Adding/changing the fields in the People Configuration
The People Listing Feature provides the basic fields to capture information for the people in your organization/department. However, you might want to gather additional information using different fields, or adjust the fields that already exist. The fields are part of the Account Profile that is part of Drupal Core. Read more…
* The People Type field should be changed prior to adding people as it is cumbersome to change the text once people have been tagged.
Displaying People
There are several people listings available as part of the People Listing Feature. These displays can be customized to meet the needs of your department or organization:
| Listing | All the people tagged | URL: yoursitename.yale.edu/ |
|---|---|---|
| Full | Faculty, Staff, Undergraduate Student, Graduate Student, Alumni | people |
| Staff | Staff | people/staff |
| Faculty | Faculty | people/faculty |
| Graduate Students | Graduate Students | people/graduate-students |
| Undergraduate Students | Undergraduate Students | people/undergraduate-students |
| Alumni | Alumni | people/alumni |
Important Note: When students become Alumni, you can automatically move them to the Alumni list by just changing their type to Alumni.
Adjusting the People Listing Feature
Adding/changing the fields in the People Configuration
The People Listing Feature provides the basic fields to capture information for the people in your organization/department. However, you might want to gather additional information using different fields, or adjust the fields that already exist. The fields are part of the Account Profile that is part of Drupal Core. To make changes, go to:
- Configuration > People > Account Settings > Manage Fields
- Locate the field you want to change and click on edit.
- Reconfigure the field as desired in the same way you would configure a field for any Content Type.
Categorizing People
If you want to display the people in your area in separate lists, based on their position or type of person (staff, faculty, etc.) you can do so by “tagging” them with the People Type tag. This tag is part of the feature, but if you want to have different people types, you need to change this prior to adding people.
- Configuration > People > Account Settings > Manage Fields
- Locate the field People Type field and click on edit.
- Scroll down and add/remove the people types to adjust it to your department’s needs.
The People Type field should be changed prior to adding people as it is cumbersome to change the text once people have been tagged.
Views Adjustments Necessary if you Add People Types
When you add people types, the following changes need to be made to your View to ensure the new people types are included in the filters. This requires that you have at least one person tagged (see Categorizing People)
- Go to http://yoursitename.yale.edu/people
- Locate and click on the Gear in the upper right corner of the of the People listing page and click Edit view.
- Scroll down to the Filter section and click User: People Type (or Faculty, …) and make sure all the options are selected in the list.
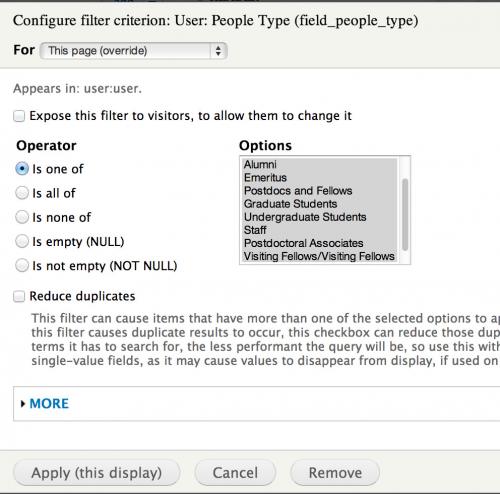
- Click on the rest of the displays and repeat the steps making sure all options are selected.
People Menu Block
The People Menu Block is a handy part of the People Listing Feature as it provides links to the people pages that are created as you tag the CAS users. This block needs to be assigned to the Sidebar First Region as it does not display when you enable the Feature.
- Select Structure > Blocks
- Scroll down to the Disabled section and locate the People Menu Block.
- Click on Configure and assign to the Sidebar First
- Assign to the following pages: people and people/*
Adding People Links to the Main Menu
By default, the People Menu Block lists the People Types in alphabetical order. Most groups prefer to list Faculty first so the links need to be added to the Main Menu.
- Click on the gear on the Main Menu and select List links.
- Click on Add link at the top, and add the URL for the People Type and the label. For example:
- Label - Faculty
- URL - people/faculty
- If you do not know the URL, return to the People Menu Block and right click to Save link as to copy the URL to the clipboard.
Rotating Header Image
The Rotating Header Image Feature is enabled when you get your site and displays the rotating image on the home page. Each image is added to the site as a separate page. You can remove or replace these images or you can add more images as desired.
Change the Existing Images
- Filter on the Dashboard for Rotating Header Image to display the pages with the image.
- Click on edit for each of the pages, click on the Remove button and replace the images that exist.
- Be sure to size the images 978px × 350px before you upload them.
Adding New Images
- Prepare your image to be at least 978px wide and 180px tall. If you do not have an image rendering software package such as Photoshop, you can resize images using PicResize.
- Click on Content -> Add content -> Rotating Header Image in the toolbar.
- Enter the Title for the page and upload an image.
- Click on the Save button to save the page and publish it live.
Assign Block to a Region
The Rotating Header Image is assigned to the Site Banner region on the YaleSites Templates. If you do not want the rotating image, you can move the block to the disabled area. If you are using a different theme, the block can be assigned to the desired region. See Working with Blocks.
Feature Specifications
Content Type Fields
- Title – title of the Rotating Header Image page (necessary to find content)
- Header image – upload field; the image should be cropped to 978px wide by 180px. The height can be modified for your site by adjusting the field in the Content Type, however, the width must be 978px to meet the specifications of the YaleSites themes.
View
- There is only one View for the Rotating Header Image feature. This View provides a Block Display that is set to rotate through the series of images for each page created with the Rotating Header Image Content Type. The FlexSlider module is used to
Video Listing
The Video Feature provides a way for departments and organizations to collect and display videos that are hosted on 3rd party video sites such as Vimeo and YouTube. The Video Feature provides a Content Type for capturing the URLs and other information for the videos and various Views to display the videos. All you need to do is fill in the fields for the Video Content Type and the videos will automatically display in the Videos listing page with the most recent on the top of the list.
Adding Videos to your site
Videos cannot be directly uploaded and stored on your site. They must be hosted on a 3rd party site such as Vimeo or YouTube.
- Click on Content -> Add content -> Video in the toolbar.
- Complete the following fields where applicable:
- Add a title for the page
- Choose a date from the pop-up calendar if it is different from today’s date
- Enter the Video URL from the 3rd party hosting service. Locate the video on the site and:
- YouTube - click on Share button under the video then copy the URL below
- Vimeo - copy the URL in the location field of your browser (i.e. http://vimeo.com/25696666) and paste it in the Video URL field.
- Enter a description of the video in the Description field
- Click on the Save button to save the page and publish it live.
Feature Specifications
Content Type
The Video Content Type has the following fields:
- Title – title of the video
- Date – date the video is posted; can be different from today’s date.
- Video URL – upload field; the image displays in the upper left corner of the landing page and as the thumbnail in the Videos listing page
- Description – main body that provides the story about the video. This can include links, lists, etc.
- URL Alias – video/page-title
Views
- Video Listing Page – listing of 10 most recent videos; full pager displays below when 11 or more news items are available. Page is set to display at yoursite.yale.edu/videos.
- Video Listing Block – displays the four most recent videos at the bottom of a video landing page; ‘More’ link in the lower right corner.
Adjusting YaleSites Features - Content Types and Views
YaleSites comes with a bunch of features out-of-the-box that allow you to easily add content and display it on your site. But what happens when you want to display your content differently? What if you want the news listing to have a “featured” article, or display a grid of videos on your home page? Not to worry, you don’t have to start from scratch, all you need to do is adjust the existing Content Types and Views for the features that already exist to display the content as desired.
This tutorial assumes you know about or are willing to learn about:
- Content Types: content entry form that stores data in the database.
- Image styles: allows you to create different sizes for images so you don’t have to have multiple images for each image that you want smaller/larger sizes.
- Views: allows you to display information in various formats and configurations based solely on the data you want to display.
Creating the Feature News Story
First we’ll show you how to create a feature news story, much like the display on working.yale.edu and news.yale.edu. We want the most recent news story to display with a larger image, the title with a link to the full story, and some text that gives an intro to the story.
- Create an Image Style for the main image to display in this block. Scale and crop 364x270.
- Add a Featured field to the News Content Type:
- Structure > Content Types > News > Manage Fields
- Add Field > List (text) > Options > Featured and other options as desired.
- Save the field settings.
- Adjust the view in the following way:
- Create a Block display
- Title: Featured News or None
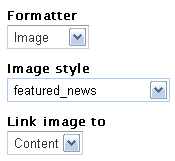
- Scroll down to Fields and click on the Image
- Select the Image Style created in step one (featured_news).
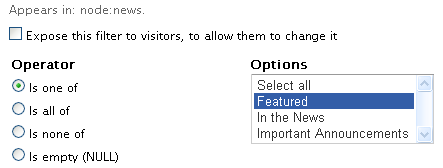
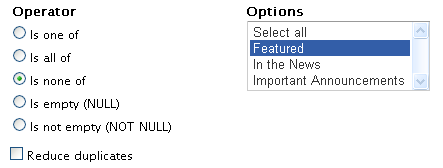
- Add News Type to the filter section and restrict it to Featured.
- Next change the Paging Options, click on the Settings and set Items to display to 1
- Save the View and your Block is now available in the Disabled area of Structure > Blocks.
- Configure the block in the following way:
- Assign to Content Region
- Assign to display only on the Home page <front>
Creating a Sub Feature Grid
- Create an Image Style for the Sub Feature thumbnail images. Scale and crop 192x114.
- Adjust the view in the following way:
- Create a Block display named Sub Feature
- Title: None
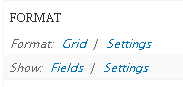
- Format: Grid settings - Number of columns * 3 Horizontal
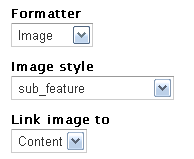
- Scroll down to Fields and click on Image
- Select the Image Style created in step one (sub_feature).
- Add News Type to the filter section and restrict it to Featured.
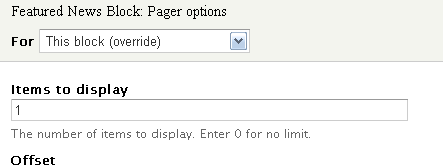
- Next change the Paging Options, click on the Settings and set Items to display to 3
- Save the View.
- Save the View and your Block is now available in the Disabled area of Structure > Blocks.
- Configure the block in the following way:
- Assign to Content Region
- Assign to display only on the Home page <front>
- Arrange the block in the listing so it is below the Featured News block.
Courses
The Course Feature provides a way for academic departments to showcase the courses and automatically link the Faculty member bios to the page. In addition to Graduate and Undergraduate course listing pages, a dynamic block is available to display related courses on the Faculty member’s bio page.
Add courses to your site
- Click on Content -> Add content -> Course in the toolbar.
- Complete the following fields where applicable following the help text to format correctly:
- Add the course name, day-time, term and year.
- Select Undergraduate or Graduate to indicate which type of course it is.
- Choose the Faculty member from the auto-complete field (the faculty member must be added first in order for them to be available in this list).
- Enter the link to the official Yale University online course information (http://students.yale.edu/oci). Locate the course, right-click on the link and open the course in a new window to get the URL for the class.
- Enter the course description in the Course Description field.
- Click on the Save button to save the page and publish it live.
- The course automatically display on the Course listing based on the type of course entered.
Displaying Courses on Faculty Profiles
You can display a list of courses linked to the Faculty Profile by:
- assigning the View: Courses: Dynamic Faculty Block to the Content Region.
Feature Specifications
Fields may be added and Views adjusted as desired.
Content Type
The Course Content Type has the following fields:
- Course name – name of the course
- Day/Time – Day and time the course takes place.
- Course Status – Graduate or Undergraduate course.
- Course Term– Spring, Summer or Fall .
- Professor/Faculty Member – link to Faculty Member who teaches the course.
- Link to OCI - Link to the official Yale University Online Course listing.
- Course Description – Description of the course.
Views
- Undergraduate Course Page – listing of Undergraduate courses in a Views accordion display. Page url is set to yoursite.yale.edu/courses
- Graduate Course Page – listing of Graduate courses in a Views accordion display. Page URL is set to yoursite.yale.edu/graduate-courses
- Dynamic Faculty Block – displays courses for the Faculty Member directly on their profile page.
Faculty Publications
The Faculty Publications Feature provides a way for academic departments to showcase the publications of Faculty members such as books, papers, publications etc. Publications added automatically link the Faculty member bios to the page and a dynamic block is available to display related publications on the Faculty member’s bio page. In addition a page of publications is available with all publications for your site.
Add publications to your site
- Click on Content -> Add content -> Faculty Publications in the toolbar.
- Complete the following fields where applicable following the help text to format correctly:
- Add the publication title and subtitle or series (where applicable).
- Choose the Author/Faculty member from the auto-complete field (the faculty member must be added first in order for them to be available in this list).
- Upload a book cover image and provide a description of the publication.
- Click on the Save button to save the page and publish it live.
- The publication automatically display on the Faculty Bookshelf listing.
Displaying Publications on Faculty Profiles
You can display a list of publications that are linked to the Faculty Profile by assigning the View: Faculty Publications: Dynamic Author Block to the Content Region.
Feature Specifications
Fields may be added and Views adjusted as desired.
Content Type
The Faculty Publications Content Type has the following fields:
- Publication title – title of the publication
- Subtitle or Series – where applicable, add subtitle of book or name of series
- Author/Faculty Member – link to Faculty Member who authored the publication
- Description – Description of the publication
Views
- Faculty Bookshelf Page – listing of publications for all Faculty on your site. Page URL is set to yoursite.yale.edu/faculty-bookshelf
- Dynamic Author Block – displays publications for the author directly on their profile page.
Quizzing Feature
The YaleSites Quizzing feature allows for creation and maintaining of learning content including quizzes. The URL can be linked directly from Training Management System (TMS) allowing users to find course, learn online, and take assessment quiz. Assessment score and participation optionally can be sent to TMS for certification.
Benefits:
- Addition of content: text, audio, video, etc.
- Table of Contents
- Single & Multi-page quizzes
- Score calculations
- Sending score to Yale’s Training Management System (TMS)
- Groups of users and role management
How To: Instructions for using the YaleSites Quizzing Feature can be found on the Assessment Module YaleSite where the quizzes and tutorials are housed.
…
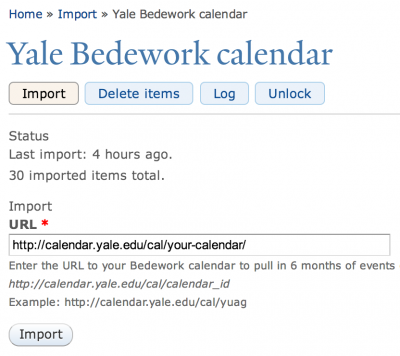
Yale Bedework Calendar Feature
The Yale Bedework Calendar Feature allows you to pull events from your existing Yale University Calendar (Bedework) so they can display on your YaleSite. This eliminates the need to enter the events in 2 places and provides you with a uniform way to display your information. If you do not have a Bedework account and would like one, please review the information at the Yale ITS website.
*Important Note: The Yale Bedework Calendar Feature shares the Content Types and Views for the Calendar & Events Feature. To avoid writing over any changes made to existing sites, all sites created prior to April 1st, 2013 must request a refresh of your site. The YaleSites team will work with you to help ensure a smooth transition with this Feature.
Using the Bedework Calendar Feature
To begin, you just first enable the Yale Bedework Calendar Module:
- Modules > Features > Yale Bedework Calendar
Then enter the URL for your calendar (e.g. through the configuration page:
- Configuration > Yale > Bedework Calendar Import
- Enter the Yale University Calendar URL in the URL field and click Import.
Details - Settings
- The Yale Bedework Calendar Feature is built using a Feeds Module and a host of others. Your events are imported every 12 hours so your events are always up-to-date.
- The events are imported into the Events Content Type and displayed in the Views that are part of the Yale Calendar & Events Feature. The page displays can be adjusted with basic knowledge of Views.
- Yale Calendar & Events Feature instructions provide details about the Content Type and Views that the Events information is imported into.