Working with Content
The most important part of your site is the content. This section provides site editors with the information necessary to update and manage content on a YaleSite, including how to create new pages, format text and upload images and files.
Creating basic content
Creating new content for your site is relatively easy. To create a Basic page:
- Click on Add content in the shortcut toolbar.
- Click on Basic page link at the top of the overlay.
- Enter the Title for the page.
- Enter the main content for your page in the Body field. Use the WYSIWYG toolbar to format text, add tables and upload images and files.
Important Note: Themes use CSS styles to create consistency in the display of content for your site. These pre-defined styles define the text size, alignment, and color. The pre-defined styles protects your site from less-technical users who might want to create a colorful rainbow of extra large text.
The WYSIWYG toolbar
The WYSIWYG toolbar provides you with all the tools you need to manage the content that is on your page. This toolbar displays at the top of your Body field when you click on the Edit tab. The diagram below itemizes the tools that are part of the basic YaleSites setup.

Formats and Styles
Typography refers to the general appearance of text on your website. Each theme has different styles for the various types of text, based on the look and feel of the site i.e. Heading styles, table styles, paragraph styles.
When adding content to your page, you can use the WYSIWYG toolbar to change the format, improving usability. These formatting options enforce the integrity of site design by only allowing fonts, sizes and styles that are part of the design. The WYSIWYG toolbar allows you to easily change the format to create bold or italic text, bulleted or numbered lists, special characters, and much more. This page provides a visual guide to the various styles for the YaleSites Standard themes.
 Heading 2 sub-head
Second level heading used in the body section of the page. Vel ancillae volutpat eu, est everti dolores definitionem ad, eum noster sapientem similique ea. Te per esse tamquam, pro dicunt aeterno appetere ad. Iusto scripta id vix, ad nam causae inermis definitionem, ad sea vidit habeo.
Heading 3 sub-head
Third level heading used in the body section of the page. Ut illum paulo eam, inani salutatus vis eu. Natum movet libris ius ex, an eum noster feugiat explicari, eu nec graece scribentur. Mel cibo fuisset albucius ut, ferri consul ut has. Primis moderatius consectetuer vim te.
Heading 4 sub-head
Fourth level heading used in the body section of the page. Vim ne summo senserit, justo graeco molestie vis at. Vis corpora pericula eu. Error blandit id qui. Facilisis laboramus honestatis pro ut.
Heading 5 sub-head
Iusto scripta id vix, ad nam causae inermis definitionem, ad sea vidit habeo. Facilisis laboramus honestatis pro ut. Illud ceteros no duo, at ceteros eligendi tincidunt usu.
Heading 6 sub-head
Iusto scripta id vix, ad nam causae inermis definitionem, ad sea vidit habeo. Facilisis laboramus honestatis pro ut. Illud ceteros no duo, at ceteros eligendi tincidunt usu.
Lists
See Create Lists for detailed instructions on how to configure nested lists.
Bulleted List
- Bulleted list item 1
- Bulleted list item 2
- Bulleted list item 3
- Bulleted list item 4
Numbered List
- Numbered list item 1
- Numbered list item 2
- Numbered list item 3
- Numbered list item 4
Nested Lists
You can mix and match bulleted and numbered lists anyway you want.
- Step One
- Step Two
- A statement about step two
- Another statement about step two
- Step Three
- Step Four
- Step One
- Step Two
- A statement about step two
- Another statement about step two
- Step Three
- Step Four
Blockquote. Use the Blockquote button
on the WYSIWYG toolbar to add these quotation marks around paragraph text. Sed diam nonummy nibh euismod tincidunt ut laoreet dolore magna aliquam erat volutpat. Ut wisi enim ad minim veniam, quis nostrud exerci tation ullamcorper suscipit lobortis nisl ut aliquip.
Tables
Tables should only be used when you have data that needs to be stored in tabular form. CSS, not tables, should be used for layout purposes.
Here is a sample table with a Header text
| Header | Header | Header | Header |
|---|---|---|---|
| Data | Data | Data | Data |
| Data | Data | Data | Data |
| Data | Data | Data | Data |
Here is a table with the Grid Table class
| Header | Header | Header | Header |
|---|---|---|---|
| Data | Data | Data | Data |
| Data | Data | Data | Data |
| Data | Data | Data | Data |
Horizontal Rule
Other Formats
- Special characters can be used for languages other than English. click on the Special Character icon
 and choose the character to add. i.e. ñ ë
 - Superscript and subscript can be used to add characters for math or chemical formulas i.e. H20, 102. Select the character and use the superscript
 and subscript
  icons on the WYSIWYG toolbar.
 - You can use strikethrough to create a line through a word or phrase. Select the word or phrase and use the strikethrough
 icons.
Ligatures
A ligature is a character, stroke or bar that connects two letters. These character combinations are particularly important with the Yale Design Fonts to ensure the proper spacing of the letters when rendering the headings on a browser window.
How was this done?
The YaleSites themes incorporate the Typogrify module to adjust the characters for readability. This solution allows content editors to write the way they normally do without requiring the use of special keystrokes or character maps to produce ligatures. In addition, words keep their correct spelling for accessibility and search engine optimization.
As distributed, the Yale Design fonts have their ffi, ffl and ff characters mapped to non-standard Unicode entity values. This first required correcting the OpenType fonts so that these ligatures were mapped to their standard Unicode values. A JavaScript was then added that looks for headings containing the “f” character strings and replaces these with their Unicode ligatures. Finally, the module was configured to replace typographers quotation marks and dashes. Optional filters for the Typogrify module include:
- Multiple adjacent capital letters can be made small-caps
- Ampersands can be made italic
Important Notes:
- Menus and breadcrumbs only show normal letters, not ligatures. The menu item at left and the breadcrumb item at top reflect the page title.
- Verdana body text remains unchanged because ligatures in this font do not display properly in Windows, fi ff fl ffi ffl
Examples of Character Combinations
The Yale typeface have been typed as normal letters and they’re replaced with ligatures automatically to ensure proper spacing.
fi ff fl ffi ffl
Roman
Bold
Italic
Bold Italic
Accent and Diacritic Marks: double dash becomes endash, triple dash becomes emdash.
Ò » ñ é ç–ô—ü í…
”Straight quotes” are converted to curly quotes, and an initial quote hangs left. A single quotation mark produces an apostrophe. This only applies to header text.
“Jayhawks” & KU fans behave extremely obnoxiously.
Widow control is also enabled in heading text, as demonstrated above.
Hyphens, em dashes and en dashes
There are times when you need to separate words or phrases in the content for your site. In the world of typography, there are distinct differences between a hyphen, en dashes and em dashes used to separate words or phrases. Often, when writing for a website, you need to use cumbersome keystroke combinations to get the correct size of your dash. However, if you follow these simple conventions, the text on your YaleSite will display dashes correctly.
| - press the dash key once | Separate words or breaks in words such as compound words (How-to Guide, grouped phone numbers 555-860-5086) |
| – press the dash key twice | double dash displays an en-dash; generally joins grouped numbers such as years or pages (1200–1400 B.C. or pages 1–5) |
| — press the dash key three times | triple dash displays an em-dash; used to separate main clauses in a sentence (I love YaleSites — It makes building a web site so easy! |
Small Photos Page
This page is all about images and the placement of images in the body area of the page. As you can see from the images below, you can vary the size and location of your images, as well as include captions below the images.
, it will show up as a caption beneath the photo. This image 450px wide and is centered.")
To create an image that spans across the top of the content page, upload an image that is 450px wide and whatever height you want. If you are using this page as a news article, you should put content above the page, otherwise the teaser in the view will not display.
Placing an image to the left of the page
 You can place an image to the left of the text by assigning the Image Left style from the WYSIWYG toolbar. Simply select the image and select the style from the list and the image will float to the left.
Placing the image to the right of the page
You can place an image to the right of the text by assigning the Image Right style from the WYSIWYG toolbar. Simply select the image and select the style from the list and the image will float to the left.
Important Note: The Left and Right image styles do not show up in the list until the image is selected.
Adding the Caption
Captions can now be placed below the image that is entered in the body section of the text. When you add the image, click on the Advanced tab and enter the text in the Advisory Title field. This text displays below the image.
Tigerman’s work has earned him critical acclaim and countless awards, especially in Chicago, where his practice has flourished for more than a half-century. The work of his firm has been exhibited more than 300 times in major galleries and art museums around the world, including the Art Institute of Chicago, the Metropolitan Museum and the Museum of Modern Art in New York. In 2007, Tigerman and his partner, Margaret McCurry, were named by Architectural Digest to its list of the top 100 architects and designers in the world.
The opening of “Ceci n’est pas une reverie” in New Haven coincides with the book launch of Tigerman’s collected writings 1964-2011, titled “Schlepping Through Ambivalence: Essays on an American Architectural Condition,” published by Yale University Press. It also coincides with the release of Tigerman’s autobiography, “Designing Bridges to Burn: Architectural Memoirs by Stanley Tigerman,” published by ORO Editions.
Also on display are such diverse objects as tableware Tigerman designed for Swid Powell, and his designs for Cannon Fieldcrest and Alessi. The exhibit also includes oil paintings from the “I Pledge Allegiance” series in the mid-1960s, “Architoons” and travel sketches from the 1970s onwards. The exhibition will be accompanied by both historical video material of Tigerman’s lectures and interviews, and a new video interview with Tigerman and others, produced by Karen Carter Lynch.
Add syntax highlighting
Syntax highlighting is a feature that allows source code to be formatted and highlighted correctly based on a programming language. To add this to your site:
- Enable the Syntax Highlighter module by visiting the Modules page.
- Next, visit the Filtered HTML text format page by navigating to Configuration > Content authoring > Text formats > Filtered HTML.
- Under Enabled Filters, check Syntax Highlighter, then under Filter processing order below that, drag the Syntax Highlighter filter below the WYSIWYG Filter. This order is important, as syntax highlighting will not work in any other order.
- Visit the Syntax highlighter setting page under Configuration > Content authoring > Syntax highlighter. From this page, enable programming languages that should have their syntax highlighted, then Save.
- Last, you need to configure the CKEditor button settings. Visit Configuration > Content authoring > CKEditor and edit the Advanced profile. Expand the Editor Appearance fieldset, scroll down to Plugins, and check Plugin file: syntaxhighlight. This will enable the {…} code button on the toolbar.
- Scroll down and expand the Advanced options fieldset, and set the Spellchecker setting to No. This disables the automatic Spell Check As You Type feature, since there is an incompatibility with syntax highlighting. Click the Save button to save the CKEditor settings.
- You can now edit or create new content, and click the {…} code button on the toolbar to insert source code. Pick a language and enter your code, and it will automatically format it after saving the content.
Add your page to a menu
If you want to add your new page to a menu, you can do that as you create your page. When you scroll to the bottom of your page, you will see a set of vertical tabs. The first option is Menu settings where you will assign your page to a menu.
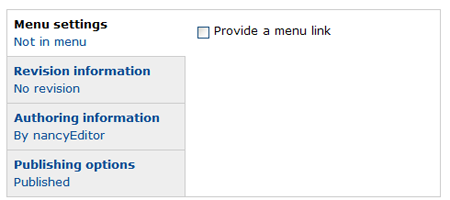
Click the Provide a menu link check-box and you will see fields for the Menu link title, Description and drop-down selector (Parent item) where you can select the menu you want the link appear on.
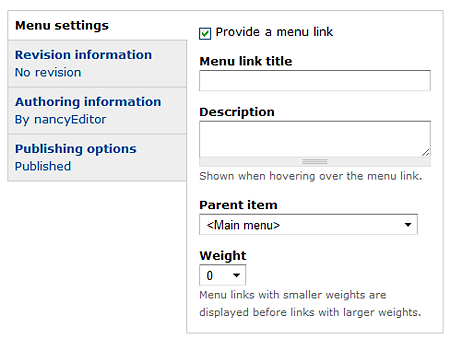
- Menu link title – the title of the page displays, but it can be changed if you want the menu link to be different from the title of the page i.e. ‘About us’ would be the menu link for About the English Department page title.
- Description – not required. This text displays when a site visitor hovers over the link so it can provide more information.
- Parent item – choose the menu you want your menu link to appear on. The drop-down selector provides only the menus that are available for that specific content type.
Create revisions
Revisions is an easy way to create a backup copy of the work you are doing in the event you want to revert to a previous version. You can enable revisions for each page you create, or it can be incorporated as part of a Content Type.
Important Notes:
- Revisioning alone does not allow you create draft versions of pages that are live. If you want this functionality, you need to enable the Workbench module.
- If you have revisioning turned on, and you are uploading files using the File field, each file uploaded will be renamed (file_upload.pdf, file_upload_0.pdf, file_upload_1.pdf. In order to avoid this, use the WYSIWYG toolbar link icon and upload files there.
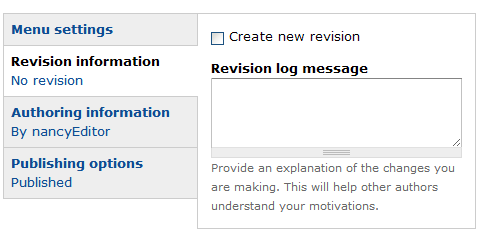
To access Revisions, click on the Revision information tab and check the Create new revision. Be sure to enter a message to indicate how your changes affect the page. If this was built in as part of your Content Type, the checkbox will already be checked.
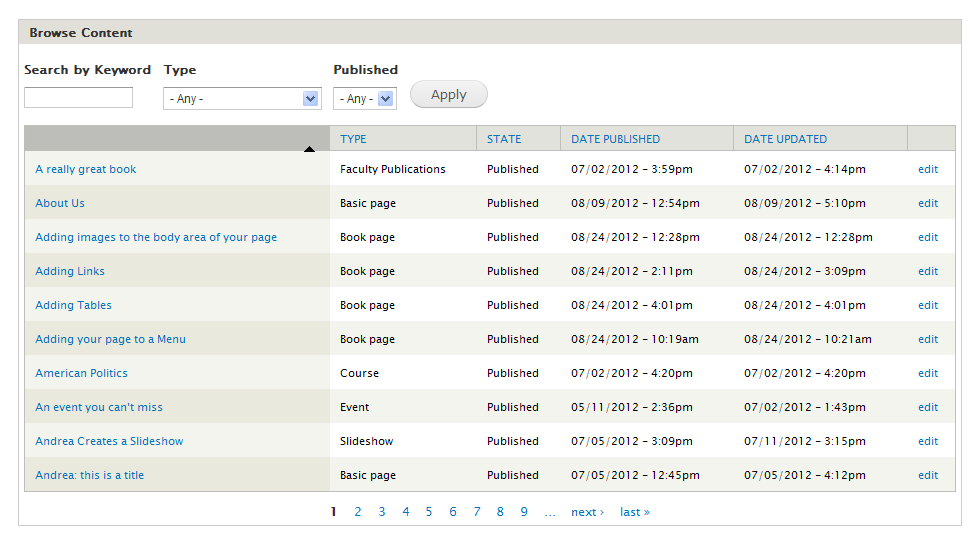
Locate and edit existing content
You can view lists of all the available content on the Browse Content panel of your Dashboard. The Browse Content listing provides a keyword search and other filters that allow you to easily find the content you are looking for.
Browse Content
- Click on Dashboard in your Toolbar (black bar across the top of your site).
- Enter a keyword and/or choose the type of content to filter the results.
- Click Apply and a listing of content that meet the criteria set displays.
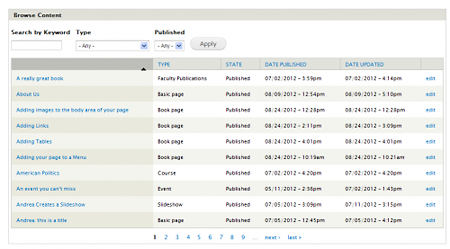
- Locate the page/node that you want to edit and click on the edit link at the very end of the row.
- Make the desired changes and click on the Save button at the bottom of the page. Once you have saved your changes on the page, the Dashboard displays where you can choose another page and make additional changes.
Editing existing content directly from the page
- Login to your site and navigate to the page that you want to edit. You will see an Edit tab at the top of the page.
- Clicking on the Edit tab will display a form page where you can make changes directly to the desired field.
Create lists
You can easily create numbered or bulleted lists using the icons on to the WYSIWYG toolbar. You can also indent a paragraph of text or highlight it with quotes.
| Numbered List | |
| Bulleted List | |
| Blockquote | |
| Indent | |
| Outdent |
Create a Basic List
- Place your cursor where you want the list to begin and click on the desired icon.
- To continue a list, just start a new line and the bullet or number style continues.
- To remove a list format, just click on the bulleted list icon again and your text has the paragraph format.
Nested Lists
You can also create nested lists using both Numbered and Bulleted lists.
- Create your first list by clicking on the Numbered list icon
 .
. - Press Return to create another list item.
- Press Return again and then click on the Indent icon
 . This creates the second hierarchy.
 - Click on the Bulleted list icon
 to change the list format to bullets.
 - Continue with the items you want to display as a bulleted list.
- When you are ready to return to a Numbered list, press Return to start a new line.
- Press Return again and then click on the Indent icon
- Click on the Numbered list icon and then the Outdent icon
 . This pushes the line out to the top level and resumes the sequence of numbers.
Quoted Paragraphs
You can use the Blockquote button
Important Note: In order to make sure the quotes are only on the one or two paragraphs you want, you need to add all your paragraphs. Then select the paragraph(s) you want to have the quotes around and click the Blockquotes icon.
Add links
Linking to pages in your YaleSite is very similar to linking with standard HTML - you select the text and then assign a URL or web address so the page opens when the text is clicked. You can create a link to an external site, to a page within your site to an email address, and to a specific location on a page (anchors).
Creating a link to an external site
To create a link to an external site, use the ![]() Link icon on the WYSIWYG toolbar.
Link icon on the WYSIWYG toolbar.
- Open a Content Type and go to the Body field or any field with a WYSIWYG toolbar.
- Enter and select the text you want to display as a link and click on the Link icon
 on the WYSIWYG toolbar.
 - Select URL from the list and enter the URL for the external site.
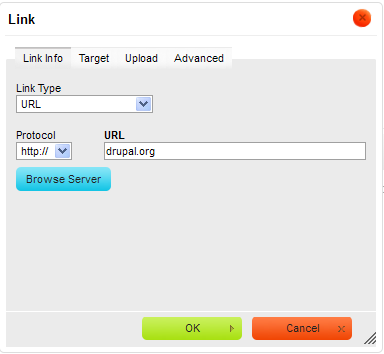
- To edit the URL just double-click on the link and the dialog appears again.
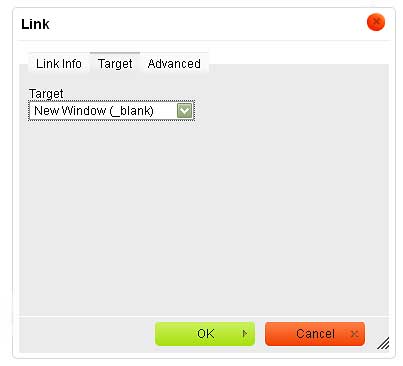
- A recommended web practice would be to set the external link to open in a new tab/window. You can do this by clicking the Target tab and then select New Window (_blank) from the pull down menu and click OK.
Creating a link to a page within your site
To create a link to a page within your site, use the ![]() Link icon on the WYSIWYG toolbar.
Link icon on the WYSIWYG toolbar.
- Open a Content Type and go to the Body field or any field with a WYSIWYG toolbar.
- Enter and select the text you want to display as a link and click on the Link icon on the WYSIWYG toolbar.
- Select Internal Path from the list in the Link Type drop-down.
- Enter the first few letters of the page within your site. A listing of all the pages within your site are listed. Choose the one that you want to link.
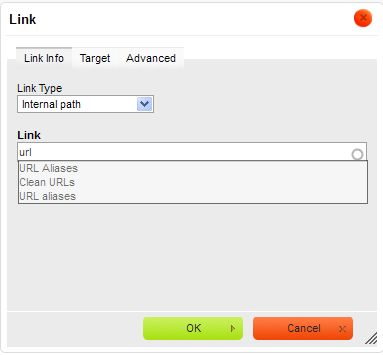
- Click on the OK button. The link displays with the name of the page you have chosen.
Creating an email link
You can create a link that opens up an email client such as Outlook express with the email and subject in the email. Use the ![]() Link icon on the WYSIWYG toolbar.
Link icon on the WYSIWYG toolbar.
- Open a Content Type and go to the Body field or any field with a WYSIWYG toolbar.
- Enter and select the text you want to display as a link and click on the Link icon on the WYSIWYG toolbar.
- Select E-mail from the list in the Link Type drop-down.
- Enter the email address and subject in the appropriate fields.
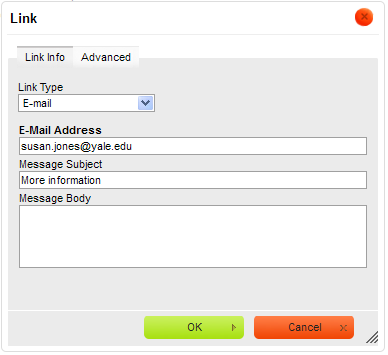
- Click on the OK button. The link displays with the name of the page you have chosen.
Creating a link to a location on a current page (anchors)
There may be times when you want to create a link at the top of a page that points to a location in a lower portion of the page. If this is the case, you can use anchors to create the links necessary to allow visitors to jump to a specific place on a web page. This is a two part process:
1) Create the anchor
- Place your cursor in the location where you want the anchor and on the click on the
 Anchor icon on the WYSIWYG toolbar.
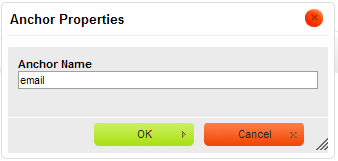
- Enter the Anchor Name and click OK. The Anchor icon shows up where you had your cursor, see below.

2) Create the link to the anchor
- Select the text you want to use as the anchor link and click on the Link icon in the WYSIWYG toolbar.
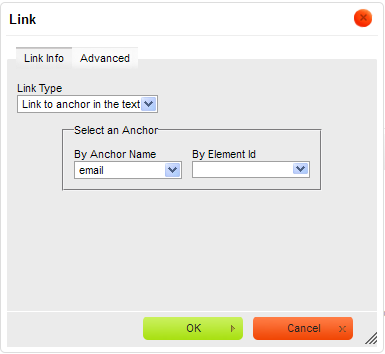
- Select Link to anchor in text from the Link Type drop-down, then choose the anchor name and click OK.
- The text selected displays as a link. Clicking on the link goes to the anchor location on the page.
Add Links to Images
You can easily add a link to an image in the following way:
- Insert the picture to the body area of your text using these instructions: Add embedded images.
Once the image is embedded and positioned on the page:
- Click on the image so that it is selected.
- Click on the Link icon in the WYSIWYG toolbar.
- Add the link using the instructions above for internal and external pages Add links
- To link to a file that was uploaded, use these instructions Upload a file.
Managing comments
Comments are useful for many part of your site whether you are soliciting feedback or engaging other visitors in conversation. The reason for using comments is not as important as how you use comments. You must manage who is allowed to comment and monitor those comments to prevented unwanted or uncomplimentary comments.
Managing comments
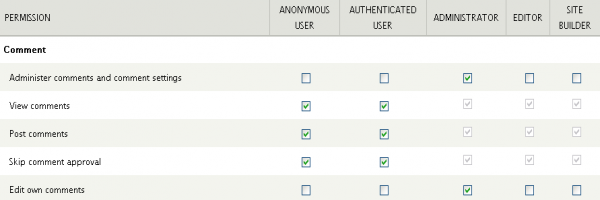
Comments can be enabled for any Content Type. If you do allow comments, it is recommended that you monitor comments prior the posts being available on your web site. By default, the Comments module is enabled, and permissions for all roles is set to allow all roles to post comments without approval.
- Select People > Permissions from the Administration toolbar.
- Scroll down and locate the Comments module.
- It is recommended that you uncheck the Skip comment approval checkbox in order to ensure comments are reviewed before they are available on your site.
- Scroll down and save your changes.
Enabling/Disabling comments on an individual page or content type
All Content Types allow you to enable to comments on your pages. When you create a Content Type, the comment settings are set to Read/Write by default. Unless you want all site visitors to be able to comment on your pages, you must disable this feature in the Content Type.

Important Note: If your site allows multiple authors and/or site visitors to comment on your site, it is recommended you put a disclaimer statement to the effect that the opinions expressed are not necessarily those of the organization/department hosting the site. Additionally, the group hosting site must regularly review or moderate content and provide ways for people to report inappropriate posts. It is recommended that each organization/department provide a statement from that content will be removed at the discretion of the organization/department.
Working with Images
Images are a great way to add interest to your site and help convey the message of your department or organizational mission and goals. However, there are lots of questions that come up when adding images including
- Where do I find images of Yale?
- How do I prepare images for the web?
- What types of images should I use?
- Can I use any photo I find on the web? How do I handle copyrights?
Images of Yale
There are many options to find images of Yale that are free and available for use, providing they promote a department, organizational or institutional purpose.
- Yale Office of Public Affairs and Communications - campus images
- School of Medicine, Web Team - medical images
- Yale Flickr
Guide to Working with Images
Once you find the images, you need to be able to manipulate them so they work in your site. The Choosing and Preparing Images For Your Site is a handy guide to help get the right images in the right place.
Regarding Copyrights
The most frequently asked question about imagery and websites is “Can I use this photo I found on Google?” In short the answer is NO; that is unless you have permission. Many of the images found on Google or anywhere throughout the web are copyrighted and therefore cannot be used without risk of legal action resulting in heaving fines. Therefore, unless you have explicit written permission to use an image from the photographer, you should NOT use that image.
Add embedded images
You can use the WYSIWYG toolbar to upload images that you want to use in the body area of your site.
- Create a new piece of content, then go to the Body field or any field with a WYSIWYG toolbar.
- Click on the Image icon.
 The Image upload dialog displays.
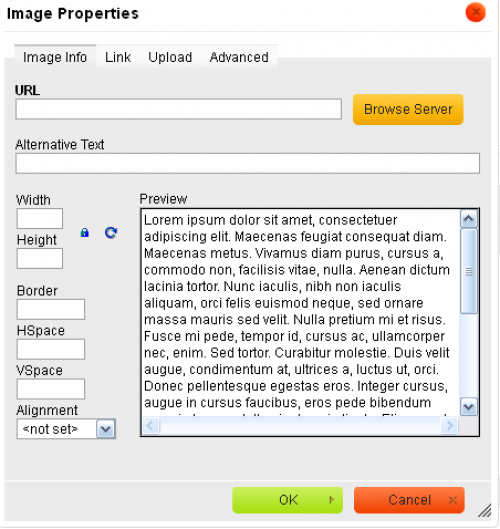
- Click on the Browse Server button. The CKFinder dialog displays.
- Click on the Upload button. The File upload dialog window opens where you can navigate to locate the images you want to upload.
- Click on the image you want to upload or hold down your Shift key to upload multiple images. The files are uploaded and available to be added to your folder.
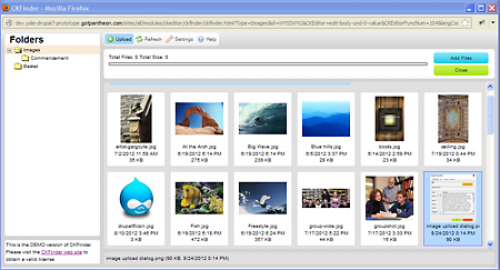
- Locate the image in the list and double-click on it.
- Add Alternate Text (Alt Text) so that screen readers can identify the image for those who are visually impaired.
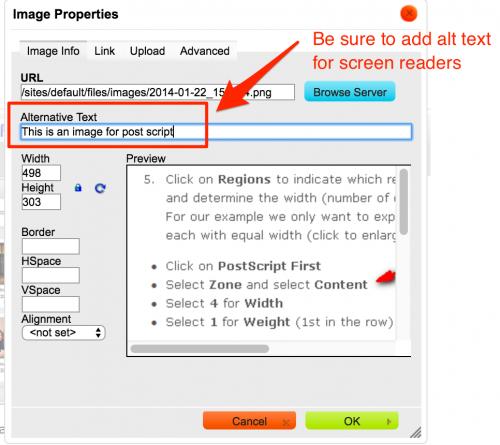
- Click OK and the image is added to your page in the location of your cursor.
Adding a Caption to an Image
If you want to have a caption display below your image, you can do so in the following way:
- In the Image properties dialog, click on the Advanced tab.
- Enter the text you want as the caption in the Advisory Title field.
- When you save the image and page, the caption displays below the image.
Cropping Images
There are times when your images need to be cropped prior to uploading, or you have a series of images that need to be the same size. To ensure the integrity of the photo, you should crop and scale the photo prior to uploading.
While there are lots of software packages that do this, the instructions below demonstrate how to crop an image using Photoshop, which can be purchased through ITS software licensing at a reasonable annual rate.
Cropping an Image for the Rotating Header Image Feature
 The Rotating Image Feature requires that images be pre-sized prior to uploading to ensure they are all the same size. Images must be 978px wide but the height can vary. However, the height should be consistent to provide a seamless transition between photos.
- Open Photoshop and the image you want to crop/scale. Important Note: the image should not be smaller than the final desired size.
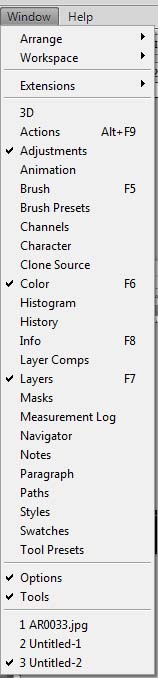
- Check to make sure the following toolbars are available:
- Options
- Tools
- If not, you can make them available by clicking on Window in the main toolbar then clicking on both Options and Tools. They should have check marks next to them when they are selected.
 With the toolbars available, click on the crop tool next on the tools menu. The Options menu displays up top.
- Enter 978 px as the width and the height in the next box (in this example, we used 350 px).

- Move your cursor over the image to where you want to start your crop. Click an drag across until you can’t drag anymore. Photoshop will stop at the width/height specified in the Options menu.
- Hover and drag the cropped section to the part of the image you want to use for your rotating photo and double click. Your image will be cropped.
- Select File > Save for Web and Devices and save as a .jpg file.
Fixing Mixed Content Warnings
About Mixed Content Warnings
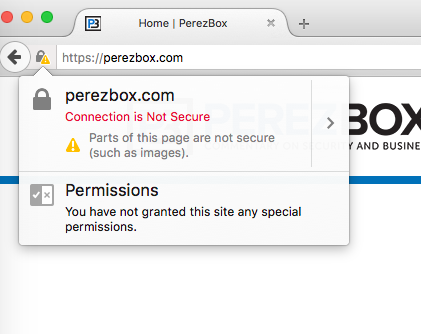
A Mixed Content Warning (pictured above) appears when a site’s connection is secure (using https) but the page content itself is not. This is commonly a result of directly referencing an existing image on the site using an absolute url pointing to http, though it can also be caused by hotlinking external images.
Though this warning will not affect the security of sensitive data, these images themselves can still present a small security risk to your site and its users.
Fixing Mixed Content Warnings
When the image causing the Mixed Content Warning is referencing an image that has been uploaded elsewhere on your site, the warning can be fixed by editing the url of the problematic image to be a relative url, rather than an absolute one. This has the secondary benefit of ensuring that the image will continue to work if the site’s base url changes, or when a test or development build is pushed to production.
To edit the image url, begin editing the page containing the image and double-click the image in the text body. Examine the URL field, which will be the first text field from the top. An insecure image will be using a full (absolute) url beginning with “http://” and containing the site’s base url, e.g. “http://yalesites.yale.edu/sites/default/files/images/Screen%20Shot%20201… .”
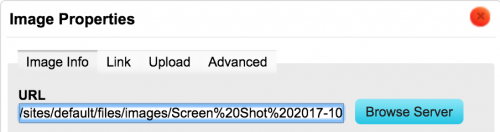
A relative url will contain everything after the “.edu”, with the format “/sites/default/files/images/filename.jpeg”, as seen in the figure above. To change an absolute url to a relative one, remove everything before “/sites” in the URL field.
Repeat the above instructions for any media not directly uploaded to the page returning the Mixed Content Warning until the warning no longer appears in your browser.
If the problematic images are being hotlinked from an external source, downloading the image and uploading directly to the site will dismiss the warning.
Add embedded video
You can embed a video stream from a 3rd party vendor (Vimeo or YouTube) to display in the body of the page you are creating.
- Locate the video you want to embed on your page at youtube.com or vimeo.com.
- Vimeo - Locate the video and click on the Share link. Then click on Embed and grab the embed code.
<iframe width="560" height="315"
src="http://www.youtube.com/embed/QoL1MMAZ0v8"
frameborder="0" allowfullscreen></iframe>
- Youtube - Locate the video and click on the Share link. Then click on Embed and grab the embed code.
<iframe width="560" height="315"
src="http://www.youtube.com/embed/QoL1MMAZ0v8"
frameborder="0" allowfullscreen></iframe>
- Vimeo - Locate the video and click on the Share link. Then click on Embed and grab the embed code.
- Click on the Embed Video icon
 in the WYSIWYG toolbar and paste the embed code where you want the video to display.
Add tables
Tables can be used when tabular data needs to be placed within a page. The ![]() Table icon on the WYSIWYG toolbar is used to add tables to the content on your page.
Table icon on the WYSIWYG toolbar is used to add tables to the content on your page.
Important Note: Tables should only be used when you have data that needs to be stored in tabular form. CSS, not tables, should be used for layout purposes.
- To start click on the
 Table icon on the toolbar and the Table Properties dialog window displays:
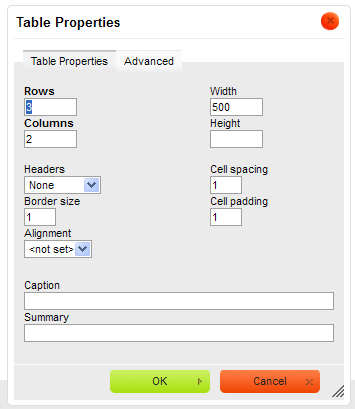
- Adjust the settings to display the number of columns, rows, etc. These settings can also be changed after the table is created.
- Click on the OK button and your table displays on the page where you can add content directly to the cells.
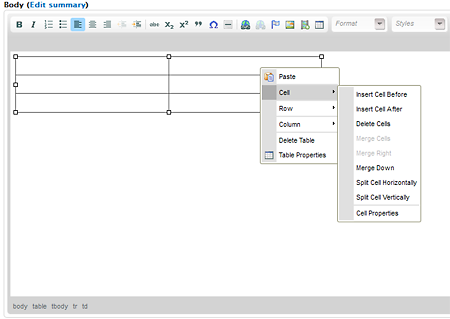
- If you want to add columns or rows, you can right click on the table to display the menus that are available for that specific function.
Upload a file
You might want to create a link within your page that opens a file or image (.png, .xls, .ppt, .pdf, .doc, etc.) You can do this using the ![]() Link icon on the WYSIWYG toolbar.
Link icon on the WYSIWYG toolbar.
- Open a content type and go to the Body field or any field with a WYSIWYG toolbar.
- Enter and select the text you want to display as a link and click on the Link icon on the WYSIWYG toolbar.

- Select URL as the Link Type and click on the Browse Server button.
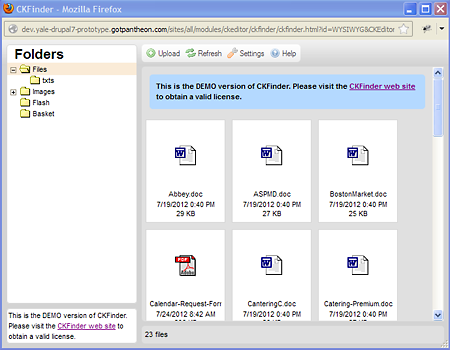
- Notice the Files folder displays in the left pane and any file that already exists displays in the right pane.
- If the file you want to use as a link already exists, just double-click on the icon and the dialog closes and the text selected displays as a link to the file.
- If the file is not available in the list, click on the Upload icon and navigate to the file(s) you want to upload.
- Double-click on the icon to upload it to the file list on your website, then double-click on the file to insert the link to the file in your text.
- If you want to upload multiple files, then just select multiple files from your desktop or local directory and click on the Open icon.
Uploading an Updated File with the Same Name
If the file you have uploaded a file and it has been updated, uploading it again can cause problems because the CKEditor automatically appends (1) to the filename of the recently uploaded file. To avoid this, we recommend deleting the file first, then uploading the updated file with the new name.
- In the CKFinder dialog displayed in step #3, click on the file you want to update and press the Delete key on your keyboard.
- Then repeat the steps above to upload the file.
Publish your page
When you create a page, your page is published by default which means it can be seen by everyone. If you do not want people to see the page, you can unpublish it by un-checking the Published check-box.
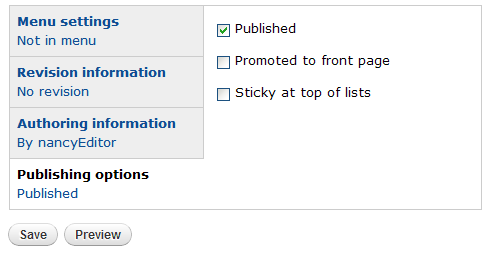
Important Note: Promoted to the front page and Sticky at the top of lists are options used in Views and discuss further in the section.