Module Type:
Supported
Version 7.x-1.0 (please see alternate instructions for 7.x-2.0)
Allows you to create a block that lists Twitter posts for a specific account. It is relatively easy to configure.
- Enable the Twitter Block module and a Discussions on Twitter block is available in the Disabled area of the Blocks listing.
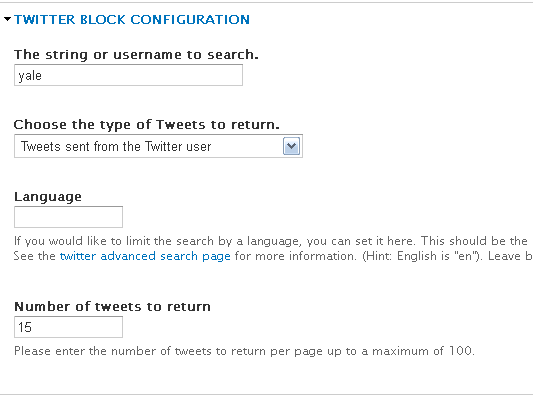
- Click on configure and scroll down to the Twitter Block Configuration section (if your configuration block doesn’t look like this, please see the 7.2 instructions)

- Enter your Twitter Account user name in The string or username to search.
- Choose type of tweets to display
- Enter the number of tweets to list in the block.
-
As with all blocks, indicate the region (Sidebar First or Second)and pages you want the block to display.
- Save the configuration. Your block will display in the region with the most recent tweets.

Twitter Block 7.x-2.0
Twitter Block Module is a 2 step configuration process: 1) get a Twitter ID for the Widget you want to display. 2) configure the Twitter Block Module.
1) Acquire a Twitter ID
The Twitter ID you will use is associated with a specific widget you want to use (User timeline, Favorites, List, etc). to create the Widget and then find the Twitter ID for that Widget:
- Login to your Twitter Account.
- Click on your picture in the upper right corner and then the Settings link in the resulting drop-down.
- Click on Widgets, the very last option under the Settings Menu on the left.
- Click on Create New in the middle pane to create a new widget.
- Choose the type of widget you want to create.
- Enter the Twitter Username and configure based on preferences.
- Click on Create Widget and copy and paste the embed code to a text editor. Then locate the Twitter ID for the Widget after the following text: data-widget-id=“12345678910” (this is not a real Twitter ID).
2) Configure the Twitter Block
Create and configure the Twitter Block as follows.
- Enable the Twitter Block module.
- Enter a Block Title and Description as you would for any Block.
- Add the Twitter ID from step 1 in the Widget ID field.
- Configure the rest of the Block based on the instructions for each field.
- Assign to the Block to regions and pages as desired.