YaleSites Custom
The YaleSites Custom offering is available to organizations that require a unique look and feel and/or complex functionality beyond what the YaleSites Templates offer. Creating a custom site requires advanced technical skills and therefore requires a staff member or external vendor with those skills to build the theme.
You can only work on the theme files in your YaleSites development environment (dev). The only files that will be migrated from your local environment to YaleSites dev environment are theme theme files, via interaction with Github Enterprise. All content types, views and content entry must be done in the YaleSites development environment.
Request & Setup
There are two important steps to get started with your custom theme:
Complete the necessary forms
You must request a YaleSite and complete YaleSites Custom Agreement in order to build a custom site.
- Use the online YaleSites request form to request a YaleSite. Indicate that you would like a custom site and preferences for development environment.
- Complete the online YaleSites Custom Agreement as part of the request form.
Once your request has been received, the Web Team will contact you to discuss the YaleSites development environment and process.
Vendor set-up
If you do not have a staff member with the technical expertise necessary to build a custom site, you can hire an external vendor. If you hire a vendor, you must set them up with Yale University Procurement and obtain a Yale NetID for anyone needing access to the site.
- To set up the vendor for Yale University, contact Yale Shared Services.
- To obtain a Yale NetID, please visit the NetIDs and Passwords page on Yale’s ITS website.
Working in development
When building a custom site, theme building is typically done on a developer’s computer, and moved to the Yale development environment for testing.
Some important information about working in development:
-
When a custom site is provisioned, the development area is automatically set up.
-
The URL for your development area is your site URL prefixed with dev (dev.yoursite.yale.edu).
-
If you have an existing site with the URL mysite.yale.edu, you should request a development environment with the URL dev.mysite.yale.edu.
-
You will need to be on campus or connected to the Yale VPN in order to access your site in the development environment.
-
Github Enterprise is used to interact with code in the development environment (instructions).
-
No content or databases will be migrated from your local computer to the YaleSites development environment. Only custom theme files can be pushed from your local environment to the YaleSites environment. The creation of content types, views, nodes, and configuration should take place in your in the YaleSites development environment only. To refresh your local computer with a snapshot of the YaleSites development environment, you can use the Site Backup module.
Building the theme
Your custom theme and its associated files will be contained in the sites/all/themes folder with the name of your theme (mytheme). Never change files outside of your theme directory as these changes will not be migrated to production.
For more information on theming, view the Drupal 7 theming guide for specifics.
Base Themes
YaleSites includes Zen, AdaptiveTheme, and Omega as base themes for your site. We recommend creating a sub-theme from one of the base themes when you create your custom theme.
Subtheming from a YaleSites theme
In addition, any of the YaleSites themes (Yale Standard, Yale Boxed, Yale Wide) can be used as a starter theme and duplicated. This provides a good starting point for your custom theme. The YaleSites themes use the Omega base theme, a flexible interface that provides all the regions necessary to build a dynamic site and follows the typeface standards set by the University Printer. See YaleSites Starter Documentation for more information.
Creating Layouts with Delta and Context
You can also create additional layouts for the YaleSites Templates using the Delta and Content Modules.
drupal.org Support
Creating your custom theme requires advanced technical skills. Please consult the drupal.org documentation, support options or User Groups to find a solution. If you have found a bug please file a bug report. Or even better, provide a patch file to fix the problem. If there is a module you need, please request it on the YaleSites Forum. All requests will be considered providing they do not create redundancy with functionality that already exists.
Important notes on creating a custom theme
-
Be sure to rename your theme to a descriptive name that matches your site.
-
Do not add SQL to your theme to build dynamic content. Themes are for display only. Use the Views module instead to create lists of content.
Hiding your theme from other sites
Since every YaleSite is derived from the same code base, your theme sits alongside other custom themes for other sites. Read more about hiding your theme from other sites.
Creating Multiple Layouts with Delta and Context
For basic layout changes we strongly recommend using the Delta and Context modules rather than adding custom template files.
Delta and Context allows you to create multiple layouts without physically touching a .tpl file in your Omega theme. For example, each of the YaleSites Templates has a home page without a Sidebar First region. This was done by rearranging the regions and creating a Delta without the SideBar First region. Then a Context module was used to assign the Delta to only be used on the Home page.
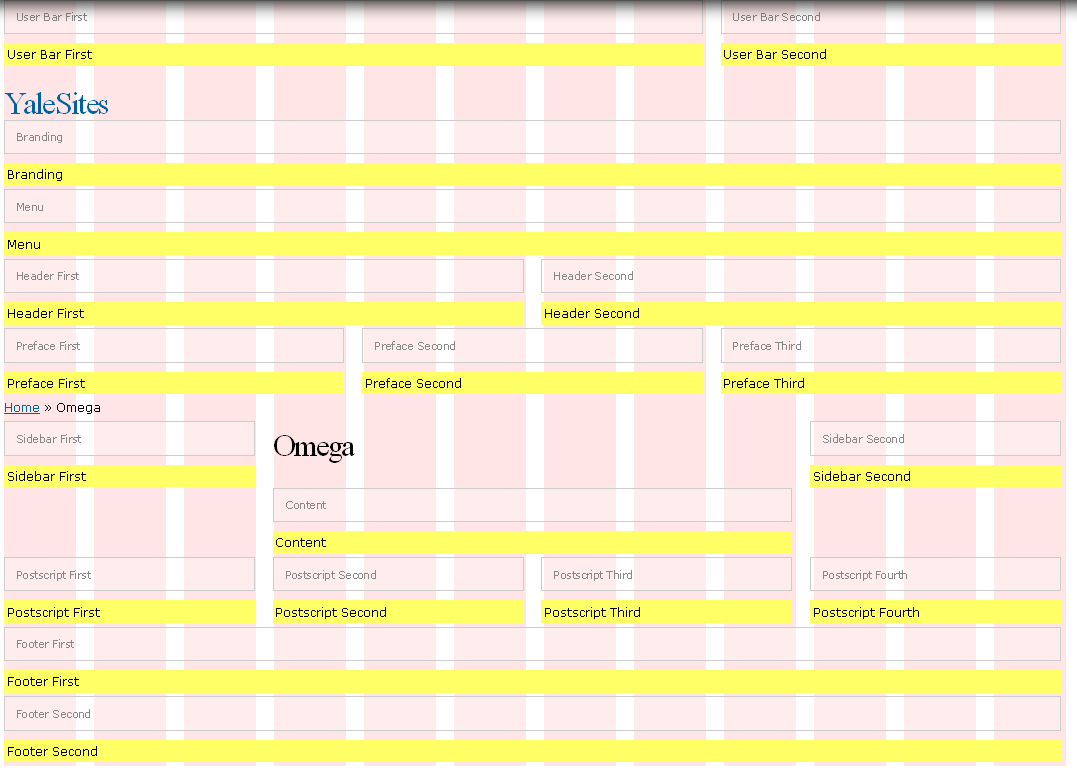
Omega 3 Theme Regions
YaleSites templates only take advantage of a few of the regions available in the Omega 3 Theme. Prior to creating additional layouts, it is important to understand all of the regions available so you can determine how best to create a new layout. The image below provides a grid with all the regions. You can find this grid on your YaleSite in the following way:
- Click on Structure > Blocks in the main Toolbar (black across the top).
- Click on the Omega tab (upper right).
- Click on Demonstrate Block Regions.


Image for all Delta Regions (click to enlarge)
Hiding your custom theme or module from other sites
Since every YaleSite is derived from the same code base, your custom theme or module sits alongside other custom themes/modules for other sites. In order to hide your them so they are only visible on your site, add the following line to your theme or module’s .info file:
allowed_sites[] = yoursite.yale.edu
Replace yoursite.yale.edu with the production URL to your site. This will allow your theme to only be visible on your site. You only need to add the production URL, and the development environment will be accounted for automatically. If the theme applies to more than one site, add additional entries as needed:
allowed_sites[] = yoursite.yale.edu
allowed_sites[] = yoursite2.yale.edu
Using Github Enterprise
Github:Enterprise is used to interact with code for custom theming and site building.
The information below assumes:
- You are well-versed in:
- Drupal development
- Git version control system
- You have a command line Git client installed or use Windows / Mac graphical tools.
- If you are not on campus, you will need to be connected to the Yale VPN
The below instructions can be adapted for the GUI GitHub client (Windows or Mac), or similar GUI Git client.
The following information is provided without support and is meant for Drupal developers only.
Identify yourself to Git
If you haven’t already, you must identify yourself to Git.
git config --global user.name 'Your Name'
git config --global user.email you@somedomain.com
Accessing Github:Enterprise
- Log in to GitHub:Enterprise using your Yale NetID and password.
- Enter an email address if you are prompted to do so, and fill out each field in your user profile.
- Add an SSH key to your account. You can use the support links at the top of the SSH key page if you need a tutorial.
- Next, you must create an organization.
- From your account settings, click Organizations > Create new organization.
- Give your organization a short name to identify your department or group.
- Put your email address in the Billing Email field. You will not be billed as this is just used for organization owner contact.
Adding users
If there are other users who need to access a repo, they will need to be added to your organization. The user must first log in to Github:Enterprise using their Yale NetID to create an account.
- Visit the Github:Enterprise home page.
- At the top left, click on your username to change your account context, and pick your organization.
- From the menu bar, click Teams.
- Next, click Owners.
- Enter the user’s Yale NetID or first name to add them as a team member.
- The user now has access to all repositories inside the organization.
Forking the repo
You must fork the main Drupal 7 repository to begin working with code.
- Fork the drupal/d7 repo. This is the master repository for Drupal 7 at Yale. To generate your fork, use the Fork button at the top right of the repo. Click Fork to [organization name].

- After the fork is built, click the Settings link in the right sidebar and rename the fork to match your site name in dev: dev.sitename.yale.edu
- Next, request a Jenkins deployment job be created for your site.
After your Jenkins job has been set up, code pushes to your fork will automatically trigger a deployment of the updated code to your dev site. It takes about 15 minutes for code to be deployed. You can verify the Jenkins job is working with following steps:
- Clone your forked repository to your local machine (must be on campus or connected to Yale VPN)
- Modify something simple (/sites/all/themes/yale_standard/css/custom.css), like adding a comment
- git add custom.css, git commit -m”made a change to custom.css”, git push, and wait 15 minutes
- Look at your site source css to see if the comment is there.
Forking multiple times
Github:Enterprise allows for one forked instance from its interface. If you are an organization and need to fork the main Drupal 7 repo multiple times for different sites you are working on, you will need to follow these steps.
- Visit the Github:Enterprise home page.
- At the top left, click on your username to change your account context, and pick your organization.
- On the right, click the New repository button.
- In the “Repository Name” field, enter your sitename in the format: dev.sitename.yale.edu
- Do not check Initialize this repository with a README.
- Click Create Repository.
- Once complete, take note of the path to your repository. It is in the format git@git.yale.edu:ORGNAME/dev.sitename.yale.edu.git
- Clone the drupal/d7 repo to your local machine:
$ git clone git@git.yale.edu:drupal/d7.git
Cloning into 'd7'...
remote: Counting objects: 130784, done.
remote: Compressing objects: 100% (31752/31752), done.
remote: Total 130784 (delta 92178), reused 130771 (delta 92166)
Receiving objects: 100% (130784/130784), 53.73 MiB | 9.46 MiB/s, done.
Resolving deltas: 100% (92178/92178), done.
Checking out files: 100% (9051/9051), done.
- Next, the remote repositories need to be renamed. We’ll rename origin to upstream and add the new empty repo we created as the origin. In the last line below, swap in the path to your repository from Step 6.
$ cd d7
$ git remote rename origin upstream
$ git remote add origin git@git.yale.edu:ORGNAME/dev.sitename.yale.edu.git
- Next, push the code from your local repository to your new remote repository. You only need to run this command with the -u parameter the first time.
$ git push -u origin master
- You now have a local repository with remotes to the correct origin and upstream.
- Request a Jenkins job be created for your site.
Working with your repo
From your repo, you have access to modify themes and modules available to your site.
Please ONLY modify files within:
- sites/all/themes
- sites/all/modules/custom
Any other changes, such as changes to Drupal core, will NOT be merged upstream.
Updating your fork
Over time, changes will be made upstream to the drupal/d7 repo, such as Drupal core updates as well as module updates and additions. You will want to pull these changes in occasionally to keep your fork up to date.
For forked repositories
To create automatically create a comparison between your repository and the drupal/d7 repository, visit this URL, replacing {ORG} with your organization name: https://git.yale.edu/drupal/d7/compare/{ORG}:master…drupal:master
Next, click the ‘Create pull request’ button. This will create a new pull request to merge the changes from the drupal/d7 repo into your repo. Fill the title in with ‘Merge changes from upstream drupal/d7 repo’ and click ‘Send pull request’. This will open a pull request, and you can click the green ‘Merge pull request’ button to merge the changes into your repository.
For non-forked repositories
This process is best done at the command line. It may also be possible to merge from an upstream remote inside a GUI Git client.
Configure remotes
When a repo is cloned, it has a default remote called origin that points to your fork on GitHub, not the original repo it was forked from. To keep track of the original repo, you need to add another remote named upstream. If you are working on a fork created from the instructions in the previous section, “Forking multiple times”, you can skip to “Fetch and merge upstream changes” below.
cd myrepository
git remote add upstream https://git.yale.edu/drupal/d7.git
Fetch and merge upstream changes
Fetch changes from your newly configured remote called upstream, and merge them, accepting all upstream changes.
git fetch upstream
git merge upstream/master -Xtheirs -m"Merge remote-tracking branch 'upstream/master'"
Push changes
Push changes to your remote repository.
git push origin master
Common Git Operations
Below are some commonly-used operations when interacting with code.
git clone
In order to work with code, you must have a local copy of it. You will find the path to clone at the top of the fork.
![]()
git clone git@git.yale.edu:drupal/d7.git
git status
After you’ve made some changes to your code, you’ll want to verify your changes before committing them. This will output a list of modified files for analysis.
git add
Git has a staging area that modified files must be added to before they can be committed. This allows for easily breaking changes up into separate commits.
Example: Add an individual file:
git add filename
Add all modified and deleted files:
git add -A
git commit
Records a snapshot of your changes. Always include a comment with what was modified.
Example:
git commit -m"Added CSS to style the home page."
git push
Your commits aren’t pushed immediately to the remote repository when committing. This pushes your changes to the remote repository.
git pull –rebase
If changes have been pushed to your fork by other users, you will need to pull them in before you can push. This pulls those changes in and applies your changes on top of them.
Getting changes merged upstream
When your work is mature, it must be merged in to the drupal/d7 main repo in order for your code to make it upstream to production.
PLEASE NOTE: Changes to your forked repo outside of sites/all/themes will not be merged upstream, and your pull request will be denied. Before submitting, please review the changed files in pull request are only files inside your theme.
Please refer to Known Issues for any known problems related you may see as part of this process.
For forked repositories
- From your repository, click the Pull Requests tab on the right.
- Next, click the green New Pull Request button.
- Review the changes of your pull request by clicking the Files Changed tab. It is helpful to then click the Show Diff Stats button to see a list of files changed, and review the list to make sure you are not requesting to have files outside of sites/all/themes/themename be merged.
- After changes have been reviewed, click the link at the top that says Click to create a pull request for this comparison. Enter a title and any comments, then click the Send pull request button.
- The Web Team will review your changes and comment back on your request. If changes are needed, you can update the code in your repository and the pull request will be automatically updated.
- If the site is going live, fill out a Go-Live request. If it is already live, a deployment will be created when your pull request has been merged.
For manually-created repositories
Github allows a repository to only be forked once. Manually-created repositories must have their code merged manually at the command line since a pull request cannot be created. To request your code be merged, please follow the steps below to create an issue. The issue will be closed when code has been merged.
- Visit the main drupal/d7 main repository issues page
- Create a new issue requesting the repository to merge from, and directories that need to be merged.
Custom module development
With the number of contributed modules available from drupal.org, it is rare that a custom module need be developed. In light of this, custom modules should not be developed without the prior approval from the Office of Public Affairs and Communications. Please first contact yalesites@yale.edu if you have questions about developing a custom module.
If your module has been approved for development, please follow the instructions in the next section.
Custom module .info file specifics
- Add your custom module to the sites/all/modules/custom directory.
- Add the following to your .info file so your theme displays in the Yale fieldset on the modules page:
package = Yale
- Since every YaleSite is derived from the same code base, your module lives in the same code base used by other sites. In order to hide your module, add the following line to your module’s .info file:
allowed_sites[] = yoursite.yale.edu
Replace yoursite.yale.edu with the production URL to your site. This will allow your theme to only be visible on your site. You only need to add the live/production URL and the dev environment will be accounted for automatically. If the module applies to more than one site, add additional entries as needed:
allowed_sites[] = yoursite.yale.edu
allowed_sites[] = yoursite2.yale.edu
Known issues
Known issues that may impact Yalesites users are documented below.
04/09/2014
Merging from the upstream Yalesites repository results in merge error
When attempting to merge upstream changes into a fork of the Yalesites repository, an error is received:
error: The following untracked working tree files would be overwritten by merge:
	sites/all/modules/contrib/date_ical/includes/DateiCalFeedsParser.inc
Please move or remove them before you can merge.
Aborting
This is due to a case-sensitivity issue between Git and some filesystems, and a file that has been renamed in the date_ical module. To fix this issue, follow the workaround below. You will first remove the file in question, then fetch and merge changes from the upstream repository.
$ rm sites/all/modules/contrib/date_ical/includes/DateIcalFeedsParser.inc
$ git fetch upstream
$ git merge upstream/master -Xtheirs -m"Merge remote-tracking branch 'upstream/master'"