Working with Images
Images are a great way to add interest to your site and help convey the message of your department or organizational mission and goals. However, there are lots of questions that come up when adding images including
- Where do I find images of Yale?
- How do I prepare images for the web?
- What types of images should I use?
- Can I use any photo I find on the web? How do I handle copyrights?
Images of Yale
There are many options to find images of Yale that are free and available for use, providing they promote a department, organizational or institutional purpose.
- Yale Office of Public Affairs and Communications - campus images
- School of Medicine, Web Team - medical images
- Yale Flickr
Guide to Working with Images
Once you find the images, you need to be able to manipulate them so they work in your site. The Choosing and Preparing Images For Your Site is a handy guide to help get the right images in the right place.
Regarding Copyrights
The most frequently asked question about imagery and websites is “Can I use this photo I found on Google?” In short the answer is NO; that is unless you have permission. Many of the images found on Google or anywhere throughout the web are copyrighted and therefore cannot be used without risk of legal action resulting in heaving fines. Therefore, unless you have explicit written permission to use an image from the photographer, you should NOT use that image.
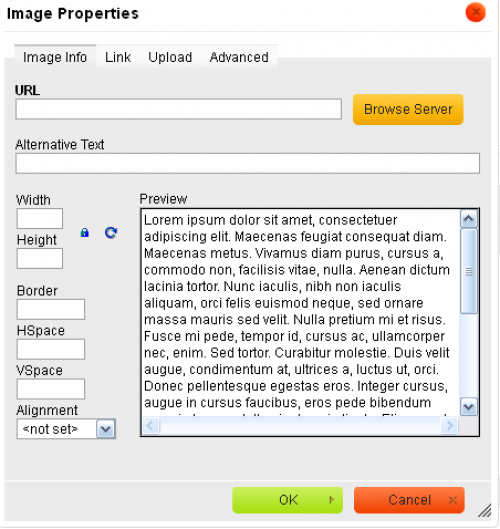
Add embedded images
You can use the WYSIWYG toolbar to upload images that you want to use in the body area of your site.
- Create a new piece of content, then go to the Body field or any field with a WYSIWYG toolbar.
- Click on the Image icon.
 The Image upload dialog displays.
- Click on the Browse Server button. The CKFinder dialog displays.
- Click on the Upload button. The File upload dialog window opens where you can navigate to locate the images you want to upload.
- Click on the image you want to upload or hold down your Shift key to upload multiple images. The files are uploaded and available to be added to your folder.
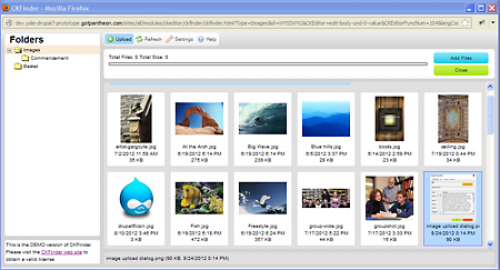
- Locate the image in the list and double-click on it.
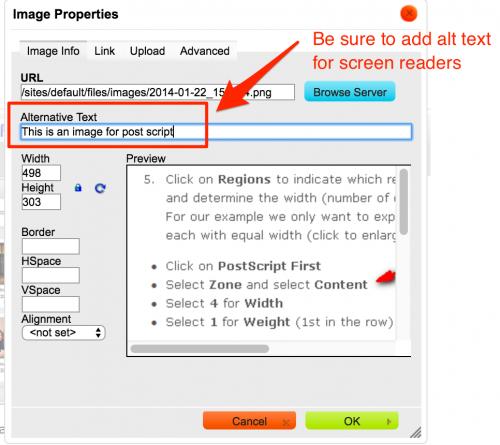
- Add Alternate Text (Alt Text) so that screen readers can identify the image for those who are visually impaired.
- Click OK and the image is added to your page in the location of your cursor.
Adding a Caption to an Image
If you want to have a caption display below your image, you can do so in the following way:
- In the Image properties dialog, click on the Advanced tab.
- Enter the text you want as the caption in the Advisory Title field.
- When you save the image and page, the caption displays below the image.
Cropping Images
There are times when your images need to be cropped prior to uploading, or you have a series of images that need to be the same size. To ensure the integrity of the photo, you should crop and scale the photo prior to uploading.
While there are lots of software packages that do this, the instructions below demonstrate how to crop an image using Photoshop, which can be purchased through ITS software licensing at a reasonable annual rate.
Cropping an Image for the Rotating Header Image Feature
 The Rotating Image Feature requires that images be pre-sized prior to uploading to ensure they are all the same size. Images must be 978px wide but the height can vary. However, the height should be consistent to provide a seamless transition between photos.
- Open Photoshop and the image you want to crop/scale. Important Note: the image should not be smaller than the final desired size.
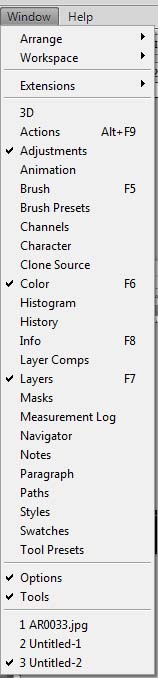
- Check to make sure the following toolbars are available:
- Options
- Tools
- If not, you can make them available by clicking on Window in the main toolbar then clicking on both Options and Tools. They should have check marks next to them when they are selected.
 With the toolbars available, click on the crop tool next on the tools menu. The Options menu displays up top.
- Enter 978 px as the width and the height in the next box (in this example, we used 350 px).

- Move your cursor over the image to where you want to start your crop. Click an drag across until you can’t drag anymore. Photoshop will stop at the width/height specified in the Options menu.
- Hover and drag the cropped section to the part of the image you want to use for your rotating photo and double click. Your image will be cropped.
- Select File > Save for Web and Devices and save as a .jpg file.
Fixing Mixed Content Warnings
About Mixed Content Warnings
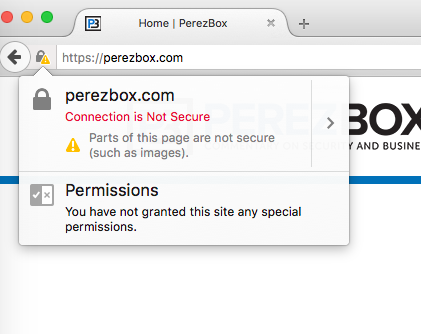
A Mixed Content Warning (pictured above) appears when a site’s connection is secure (using https) but the page content itself is not. This is commonly a result of directly referencing an existing image on the site using an absolute url pointing to http, though it can also be caused by hotlinking external images.
Though this warning will not affect the security of sensitive data, these images themselves can still present a small security risk to your site and its users.
Fixing Mixed Content Warnings
When the image causing the Mixed Content Warning is referencing an image that has been uploaded elsewhere on your site, the warning can be fixed by editing the url of the problematic image to be a relative url, rather than an absolute one. This has the secondary benefit of ensuring that the image will continue to work if the site’s base url changes, or when a test or development build is pushed to production.
To edit the image url, begin editing the page containing the image and double-click the image in the text body. Examine the URL field, which will be the first text field from the top. An insecure image will be using a full (absolute) url beginning with “http://” and containing the site’s base url, e.g. “http://yalesites.yale.edu/sites/default/files/images/Screen%20Shot%20201… .”
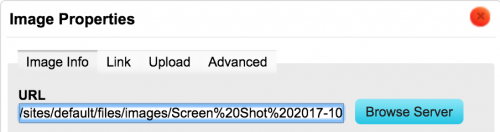
A relative url will contain everything after the “.edu”, with the format “/sites/default/files/images/filename.jpeg”, as seen in the figure above. To change an absolute url to a relative one, remove everything before “/sites” in the URL field.
Repeat the above instructions for any media not directly uploaded to the page returning the Mixed Content Warning until the warning no longer appears in your browser.
If the problematic images are being hotlinked from an external source, downloading the image and uploading directly to the site will dismiss the warning.