Migrating Content from One Site to Another
We get a lot of questions asking how to migrate data from a D6 YaleSites to D7 or from other web formats (HTML or other CMS). At this time, there is no direct method to migrate content, however, much of the data can be migrated using the Feeds Module. With a little preparation, this process can provide a relatively painless way to facilitate moving the content from one location to the other.
Feeds Module pulls data from a feed or file into a Content Type with fields that match data structure being imported. When configuring the Feeds module, the fields are mapped so the data is available in the correct fields the field names in the file are mapped to the fields in the Content Type.
**Important Note: some of the techniques in this tutorial require advanced knowledge i.e. creating Custom Content Types, Views, Excel Macros etc.
Real World Example
You have a page that lists the department names, chairs, phone and fax numbers. You will need a comma delaminated text file and Content Type with those fields. The Content Type needs to be structured with the same fields as the data that is being imported.
The text file would be structured like this:
- department,chair,phone,fax.
The Content Type would require the following fields:
- Department
- Chair
- Phone
- FAX
Step 1 - Preparation of Data
Before you can import the data you must do the following:
- Get the data you want to import into your site into a format that can be imported - in this case a CSV file.
- Create the Content Type that the data will be imported into.
Getting the Data into a CSV File
In order to import the data, the content needs to be in a format that can be read by the Feeds importer – in this case a CSV file which is a text format that can be generated with an Excel spreadsheet. If the data is already in table form, where each field is in its own column, you can copy and paste it from the web page directly to an Excel Spreadsheet. If not, you will need to do some configuration to ensure the data can be mapped to the fields in your content type. Important Note: If you do not have a unique field in your listing, you will need to create a GUID field/column to ensure no overlap of data.
Creating a View with Tabular Data**
If you are importing from another YaleSites (D6 or D7) you can create a page display in a View using the Table format, where each column contains a where the data displays. Be sure to set the view to display all records.
|
Department |
Chair |
Phone |
FAX |
|
English |
Michael Warner |
203-432-2233 |
203-432-7066 |
|
Physics |
C. Meg Urry |
203-432-3650 |
203-432-6175 |
Creating the Content Type**
The Content Type is where the data is transferred with the fields module. For each column in your table/or text field, you need to have a field where the data ultimately will live. For this example, we would create a Content Type with the following fields:
- Department – Text Field
- Chair – Text Field
- Phone – Text Field
- FAX – Text Field
Step 2 - Creating the Importer
- Enable the Feeds Admin UI Module (the Feeds Module is enabled as part of your YaleSite).
- Select Structure > Feeds importer > Add importer
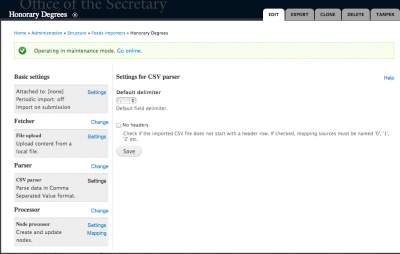
- Give the importer a Name and Description and click Create. The following dialog displays:

- Click on Settings and change the settings to match the image below and click Save (click image to enlarge). Most should remain the same:

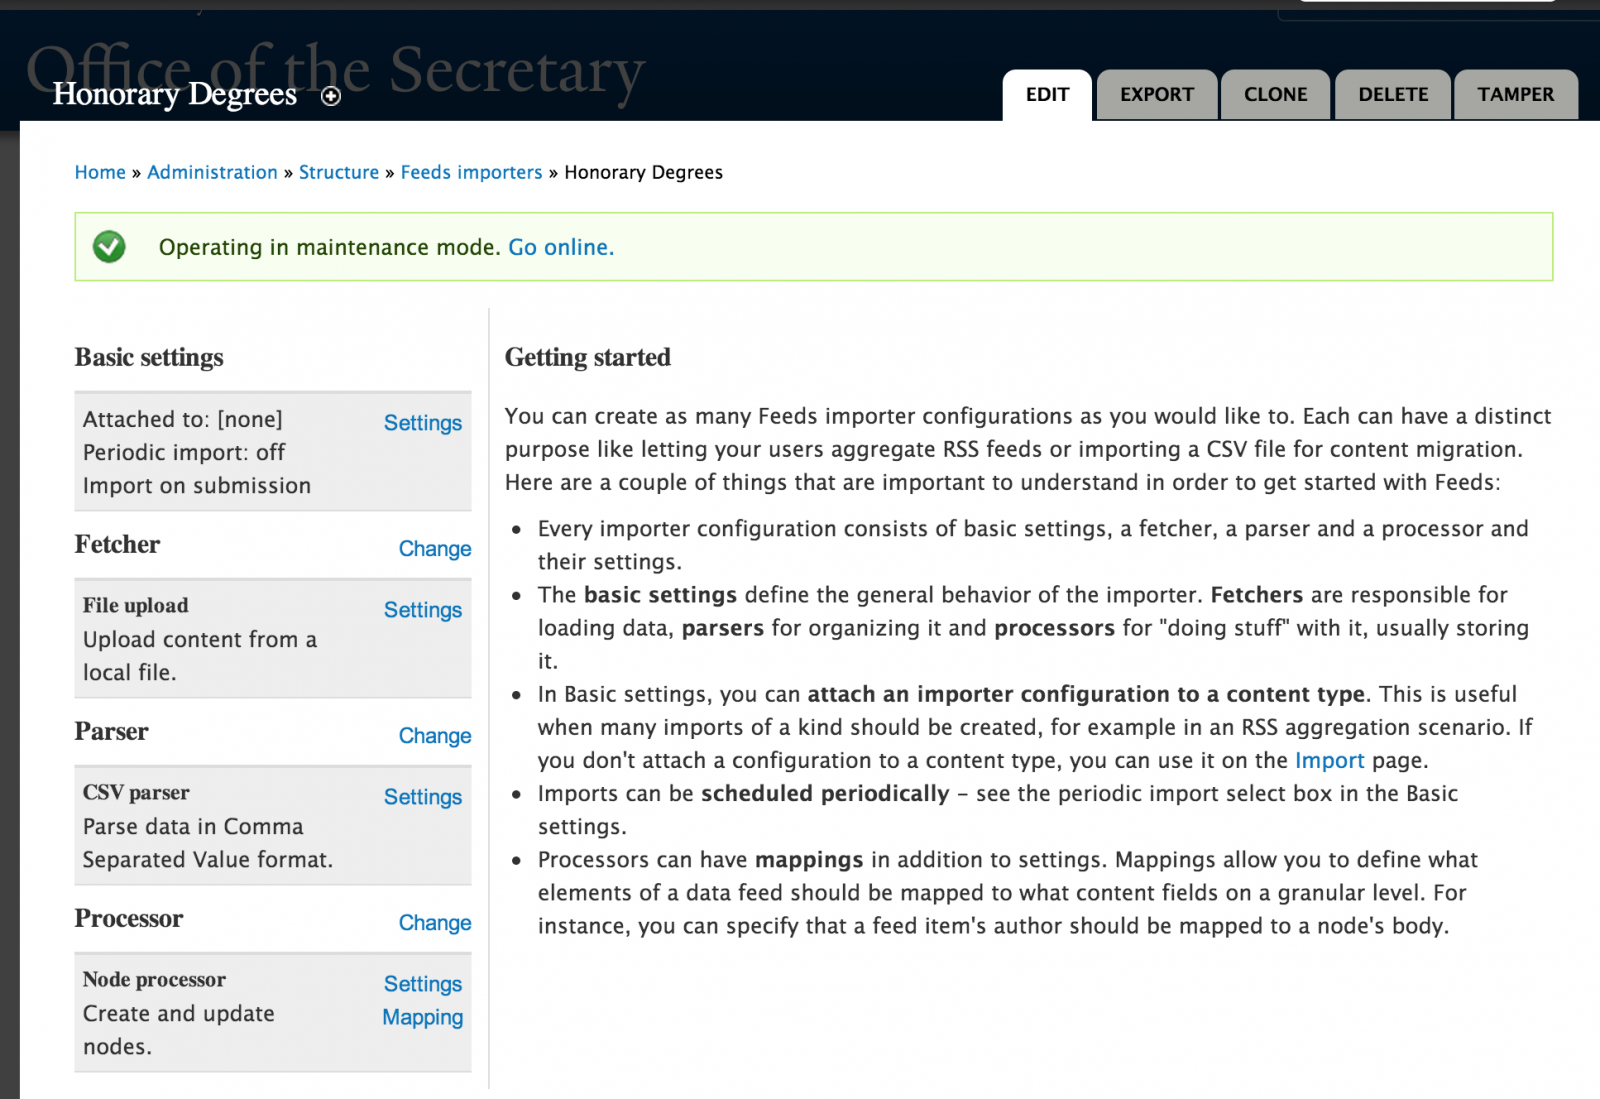
- Click on Change next to Fetcher and click on the File Upload Select radio button to match the image below and click Save (click image to enlarge).

- Click on Settings next to File Upload and change the Allowed file extensions if desired and click Save (click image to enlarge).

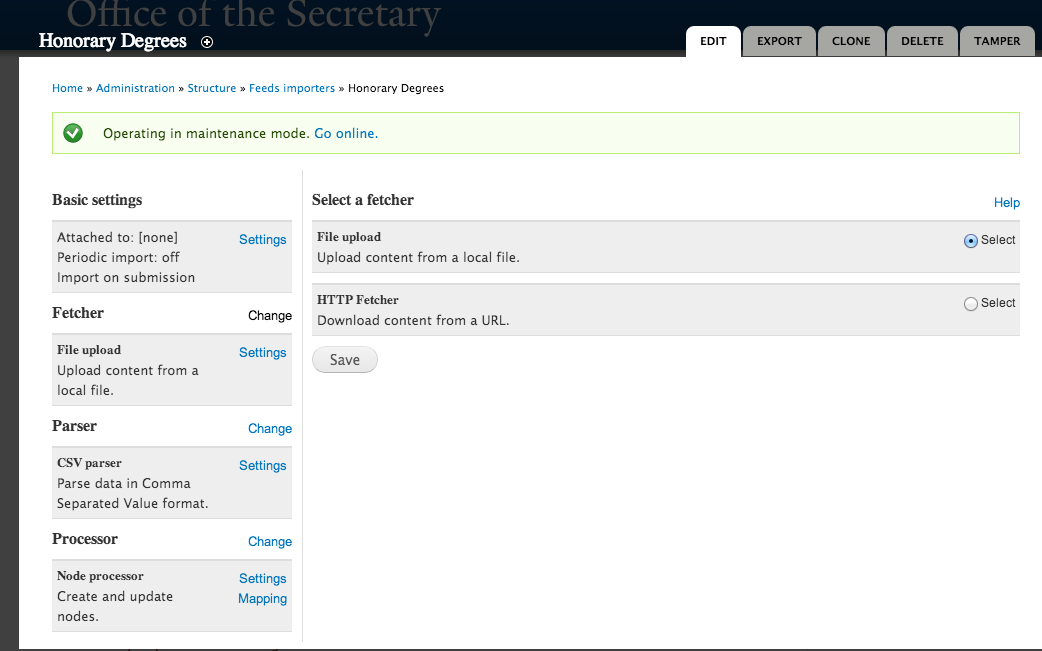
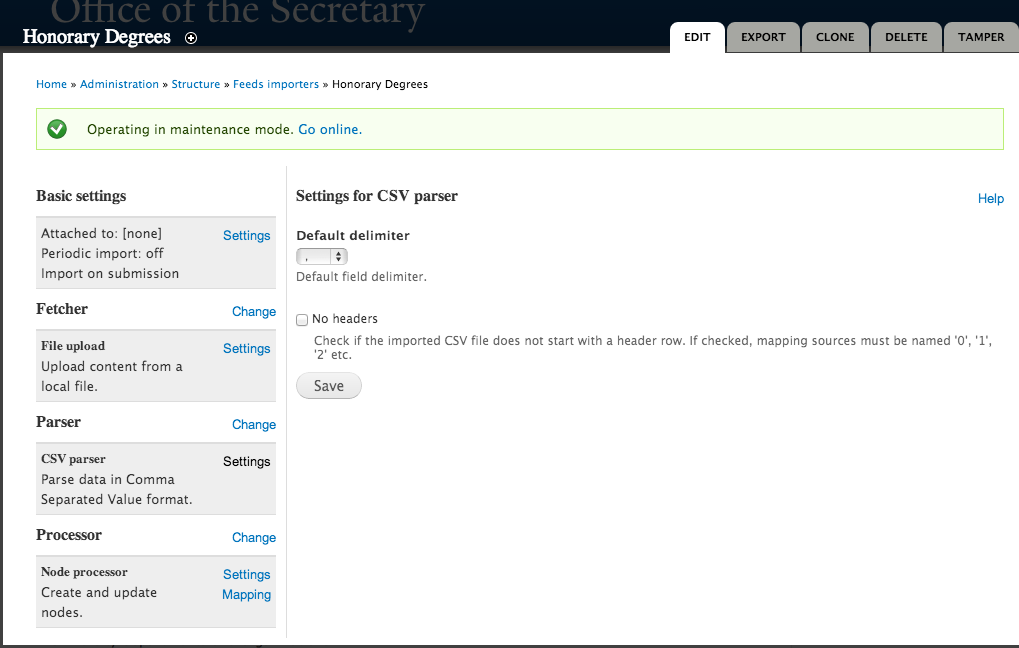
- Click on Change next to Parser and click on the CSV Parser radio button to match the image below and click Save (click image to enlarge).

- Click on Settings next to CSV Parser – DO NOT CHANGE ANY OF THESE SETTINGS. (click image to enlarge).
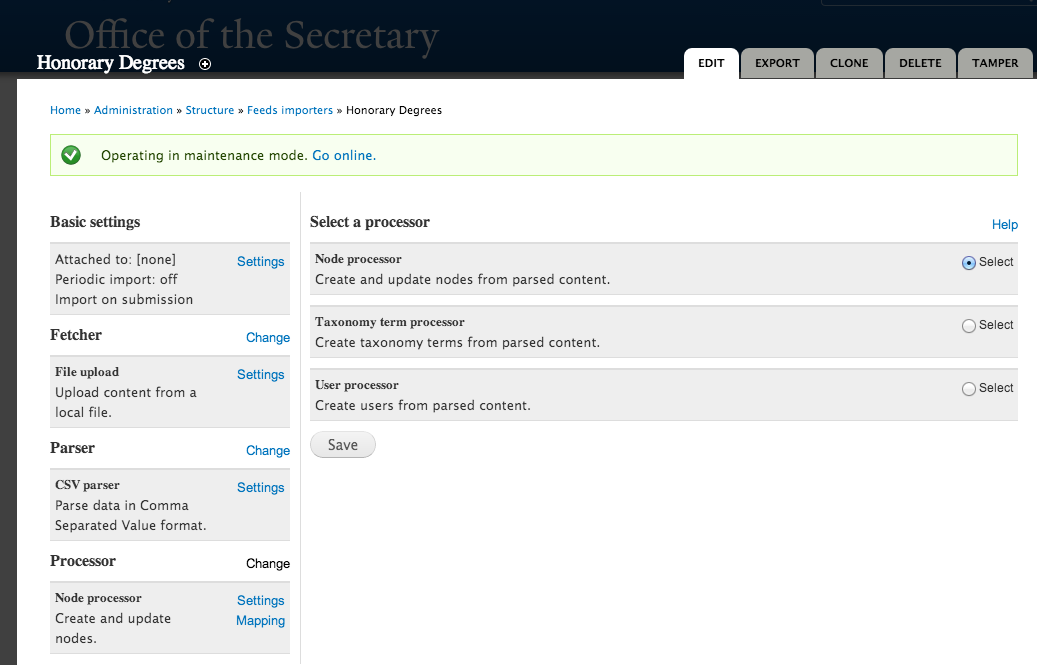
- Click on Change next to Processor and click on the Node Processor Select radio button to match the image below and click Save (click image to enlarge).

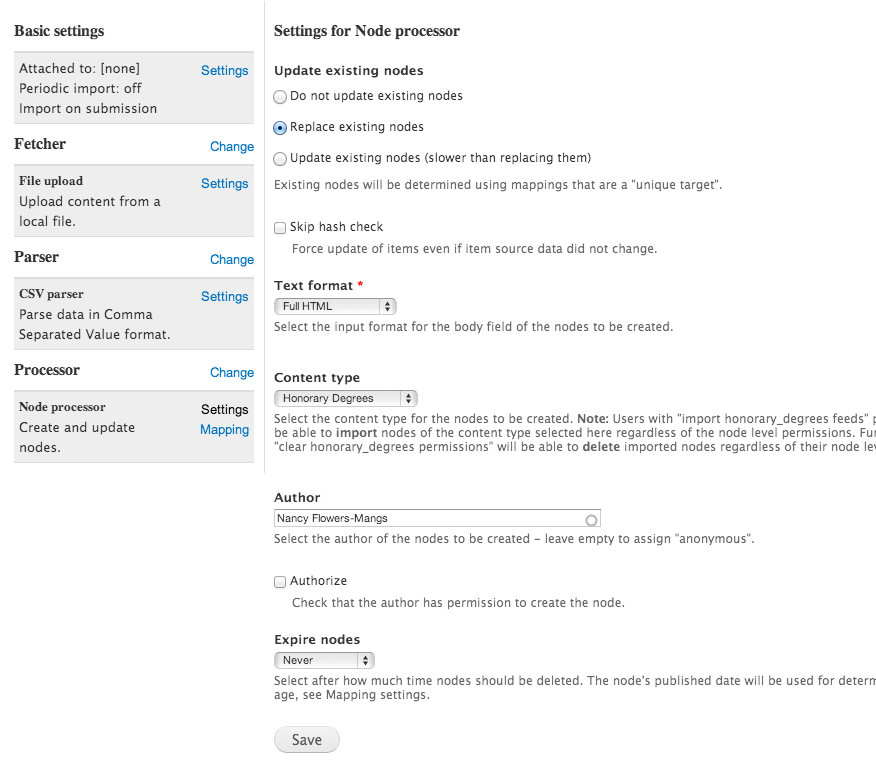
- Click on Settings next to Node Processor and adjust based on the image or personal preferences. (click image to enlarge). Important Note(s): In the Content Type field, be sure to select the Content Type you want to import the data into. Be sure to change the author from Anonymous to someone in your group (type the first few letters to produce a list of available people).

- Click on Mapping next to Create and update nodes. This is where you will “map” your fields in the Content Type - TARGET with the data from your CSV file - SOURCE (click image to enlarge)
- Select a target or field that is part of the Content Type indicated in Step 10.
- Enter the name of the column from the CSV file that contains the data you want to go in that field.
- Be sure to incorporate a GUID as the unique identification number to ensure data does not get overwritten. You must have a unique field in your CSV file (Email, Title, URL sometimes works). If you do not, just create a new column, with a title of GUID and create a unique number for each entry by dragging down with the fill handle.


Step 3 - Import the Data
Once you have created your importer and your CSV file is all set, you just need to import the data.
- In the base URL of your site, enter import after yale.edu (http://yoursite.yale.edu/import).
- Click on the name of the importer you just created and the import dialog displays:
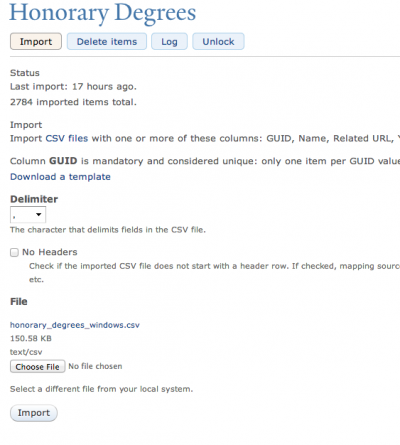
- Click on the Choose file button and upload the CSV file.
- Click on the Import button and your data is imported.
- Go to the Content listing, filter by your Content Type and you should see a new “page” for each record imported.
When Feeds Import Doesn't Work
OK, you’ve created the importer and prepared the data. You click on the Import button and nothing happens - either no records are imported or only a partial list was imported. This is actually very common because the data needs to be cleaned up a little so that is can be read by the database. Here are some things you can do to ensure that your data gets imported quickly and accurately:
Feeds Tamper Module
The Feeds Tamper Module allows you to adjust content that a feed is importing before it is saved. When enabled, the Feeds Tamper Module provides a variety of plugins that help to “purify” the data before it is imported by decoding or encoding HTML characters, stripping HTML, changing the case of characters and many more. See the Full List of Plugins for existing plugins.
Removing Gremlins or Unwanted Characters
Gremlins are are unwanted characters that you can’t see but the database can (and it doesn’t like them). This is very frustrating because you can’t “see” the problem in your basic text or CSV file; but the import will stop when the database gets to the first hidden character. In order to avoid this, you need to remove the gremlins/unwanted characters before you import the file:
MAC
- Open the CSV file using the TextWrangler program. Select Text > Zap Gremlins. You will be asked to replace it with another character. It is recommends you just press the spacebar to replace the character with a space.
- If you want to view the characters prior to zapping them, select View > Text Display > Show Invisibles. Your text document will display the characters.
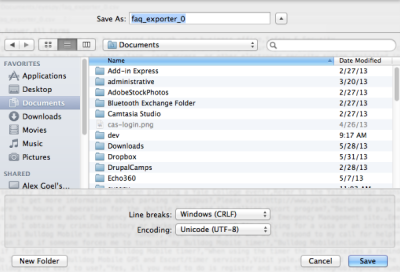
- Save the file as Line breaks: Windows (CRLF), Encoding: Unicode (UTF-8)
PC
- To view the characters prior to zapping them, select View > Show Symbol > Show All Characters. Your text document will display the characters.